Battle of Bautzen, 1813 — After Action Report
This AAR continues my series of WDS Napoleonic battle reports. It is intended not simply as a turn-by-turn account, but as a case study of command decision-making under uncertainty within the WDS engine.
Bautzen is a large battle fought across a wide front and complex terrain, with delayed reinforcements, multiple reinforcement routes, shifting reserves, uncertain enemy intentions, and incomplete information. In such a battle, the key question is not only what happened, but how information was gathered and interpreted, how that assessment shaped subsequent decisions, and how those decisions were translated into action.
This AAR follows the battle from the perspective of Allied Headquarters. It examines how the Coalition interpreted the battlefield at the operational level, assessed French manoeuvres and intentions, read the terrain, and decided when to attack, hold, or withdraw.
In military terms, the challenge is not information alone. It is the conversion of information into operational understanding, operational understanding into decisions, and decisions into action.
That is the focus of this report: Bautzen as a decision system.
This AAR is also an experiment with the format itself — hopefully a step toward interactive battle reports.
As usual, the game files for the relevant turns can also be downloaded here for those who wish to examine the battlefield and explore the decisions themselves.
After the defeat at Lützen, the Russo-Prussian army fell back toward Bautzen and the Bohemian frontier hoping to bring Austria into the war. Historically, this bet had not materialised as Vienna remained cautious, watching events unfold while the Allies continued the campaign without Austrian support.
In this scenario, however, the calculation succeeds.
Austria decides to enter the war earlier, and Schwarzenberg is ordered to march north from Bohemia with the forces immediately available. This is not the full weight of the Austrian Empire, but rather the first battle-ready formation that can be brought to the field - roughly 45,000 men.
That force is enough to change the character of Bautzen.
Instead of a battle between Napoleon and the retreating Russo-Prussian army alone, Bautzen becomes a wider Coalition effort. The Austrians are expected to arrive from the south, through the roads leading out of Bohemia, and reinforce the Allied army on the left.
DATE: MAY 20-21, 1813 · SIZE: LARGE · LOCATION: BAUTZEN, GERMANY
Scenario Briefing: An alternative setup where Austria does not hesitate to enter the War earlier and part of the Austrian army arrives in time to interfere with the Spring Campaign. Schwarzenberg brings roughly 45,000 men - not enough to decide the battle but enough to challenge the French superiority.
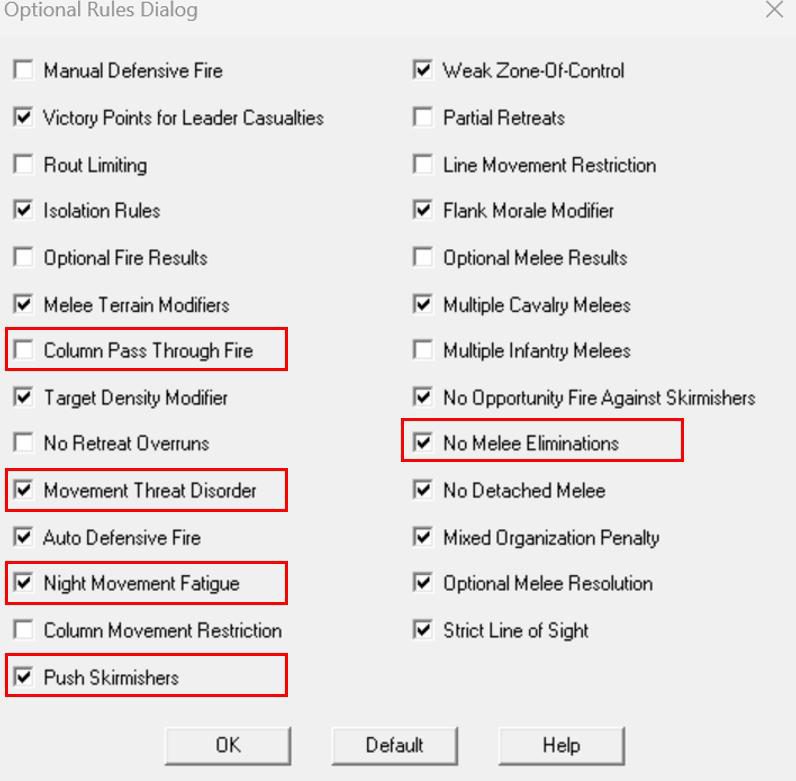
My standard version of optional rules is used:
Image 2: Red boxes indicate deviation from the default.
House rules used:
At a high level, the numbers tell a very asymmetric story of French superiority of 180k vs 140k allied troops. The French advantage is overwhelmingly in infantry mass of 1.5 French to 1 Allied infantryman [161k vs 108k].
The Coalition, on the other hand, holds a decisive edge in both cavalry (33k vs 17k) and artillery (669 vs 492). This combination is deadly provided there is a suitable ground to use this advantage. The factor limiting this advantage is that the battlefield is full of minor hills and slopes limiting artillery Line of Sight and also there are dozens of streams limiting the allied cavalry's ability to operate freely.
The two armies want different battles.
The French want a wide battle. Their strength is mass. They need to extend the front, stretch the Allied line, and eventually find a sector where their infantry numbers can be brought to bear. If the battle becomes a long, broad contest of attrition, French numbers will tell.
The Coalition wants a narrower and more selective battle. Its strength lies in concentration, artillery fire, cavalry threat, and local counterstrokes. The Allies cannot afford to defend everywhere equally. They must read the French deployment, identify overextension, and strike where cavalry and artillery can create a temporary advantage.
Picking up the right spot for battle is critical to allow the allied army to create killing zones in some sectors and relying on cavalry for rapid concentrations of cavalry exploiting and punishing French overextension.
The French army is built to impose pressure across space.
The Coalition army is built to achieve local superiority and, on favourable ground, create deadly fire zones
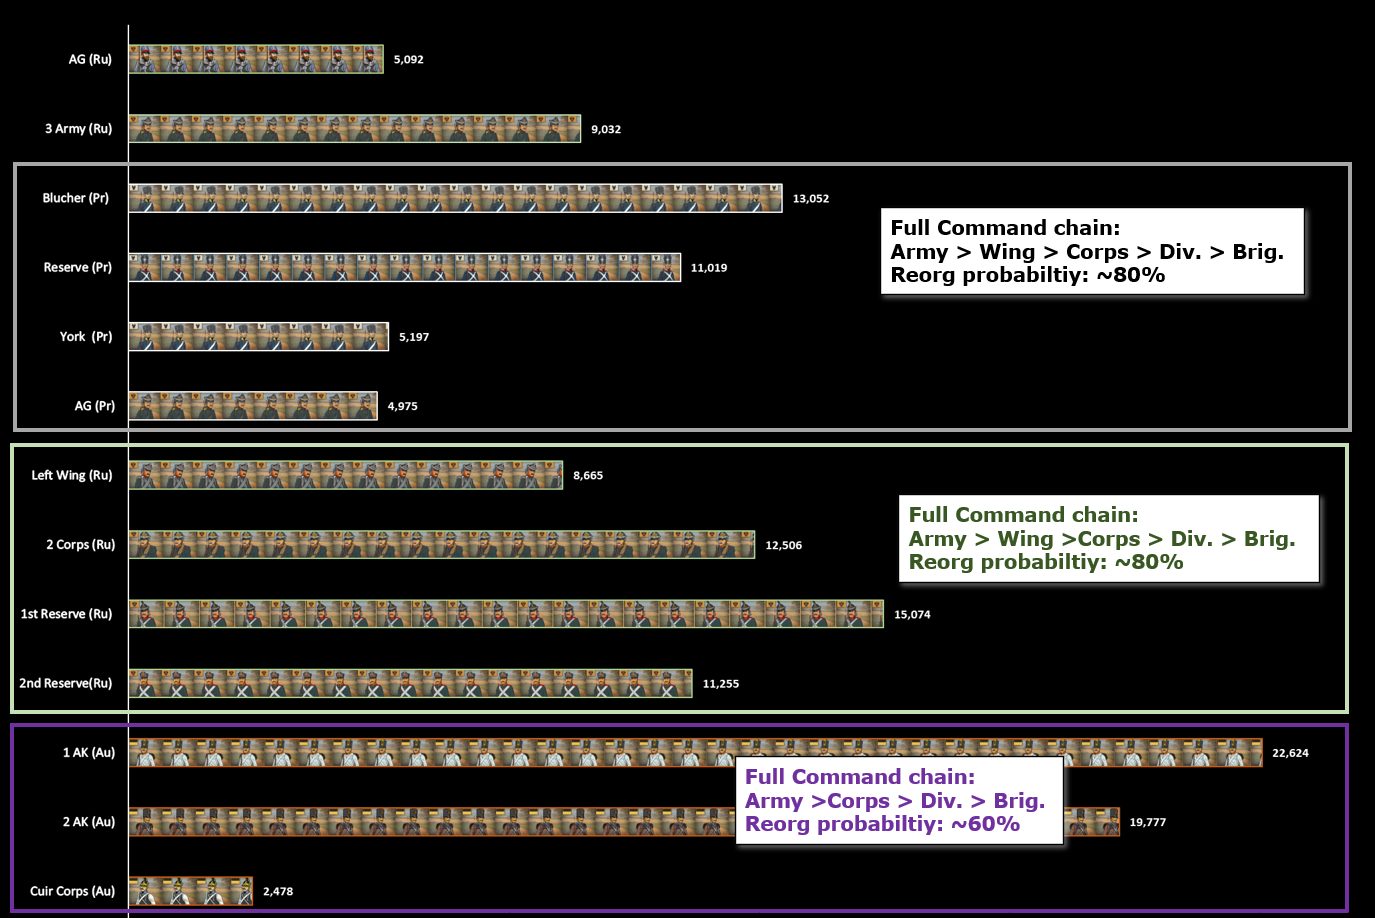
The Prussians are the most balanced and tactically reliable part of the army. They have good infantry, strong cavalry, effective light troops, and solid artillery. Their command structure is also strong, with a reorganisation rating close to 80%. The Prussians also have a solid artillery park of 132 guns, or around 3.8 guns per 1,000 men. This makes them suitable for both defensive fighting and local offensive action.
The Russians are more artillery-focused with an astonishing ratio of roughly 7 guns per 1,000 men. Their infantry battalions are smaller and cannot rely on musketry alone. But the Russian army brings a powerful artillery arm, including a large reserve, and several excellent cavalry formations. If positioned well, the Russians can create dangerous fire zones and support decisive counterstrokes.
The Austrians are the weakest component. Their infantry is mostly lower quality, their artillery ratio is poor (2.1 guns per 1,000 troops) and their reorganisation rating is lower, at around 60%. Their arrival is also uncertain and fragmented. 1 AK, 2 AK, and Nostitz's cavalry may enter by different roads, which means the Austrians may appear separated and outside effective army-level control.
This makes the Austrians both a reinforcement and a risk.
If they arrive in the right place, they can add weight to the Allied left or centre. If they arrive in the wrong place, they may become an isolated target before they can link up with the main army.
The Russian army has around 62,000 men, strong cavalry, Guard infantry, and a very large artillery arm. The Russians have 285 guns distributed across the army, plus another 156 guns in the artillery reserve. This gives them exceptional artillery density.
The operational implication is clear: the Russians need ground where their guns can matter.
If placed on poor terrain, their infantry may struggle to win firefights by itself. If placed on open ground, with cavalry support and clear fields of fire, the Russian army can become extremely dangerous.
The Russian cavalry is grouped into divisional-sized formations spread across the corps. The Advance Guard cavalry consists mostly of Cossacks and has limited combat value.
The 1st and 2nd Reserve Corps are the strongest Russian formations, made up of grenadiers, Guard infantry, elite cuirassiers, and Guard cavalry.
The Prussians are the sharpest instrument in the Coalition army.
At around 34,000 men, they are not the largest force, but they have the best overall quality. Their infantry includes a high proportion of A-quality units, their cavalry is excellent, and they have enough light troops to contest the skirmish fight against French infantry.
They also have 132 guns, giving them a solid artillery park. Combined with their high reorganisation rating of around 80%, this makes the Prussians well suited for active defence.
They can hold, strike, and reorganise quickly. If the French become overextended, the Prussians are the formation most capable of exploiting the moment.
The elite Reserve Corps, Brandenburg, is made of Guard infantry and excellent A-quality cavalry, most of which is heavy cavalry. It is the most capable formation in the Allied army and I intend to use it as the operational reserve: a fire brigade in defence and a shock force when the opportunity for attack appears.
The Austrian army brings numbers, but not certainty.
At roughly 45,000 men, it is large enough to change the battle. But its quality is weaker than the Russian and Prussian formations. Its line infantry is mostly lower quality, its musketry is poor (same FP as French conscripts) and its artillery support is thin: only 96 guns for around 45,000 troops.
The Austrian command problem is even more important. The three Austrian formations arrive separately and may enter by different roads. This means the army may not appear as a single operational mass. It may instead arrive in fragments, some close to the Allied army, others exposed on the flank.
For Allied Headquarters, this creates a paradox.
The Austrians are needed to strengthen the line. But until they are concentrated, they may need protection themselves.
Their arrival therefore becomes one of the central intelligence and command problems of the battle.
The French army has mass. It also has the Imperial Guard, which is the most dangerous reserve on the battlefield.
But much of the French line infantry is D quality. Many formations are made up of inexperienced troops with poor musketry. These units are not ideal for prolonged exposure to Allied artillery, cavalry threats, or sustained firefights against better Coalition infantry.
This creates the French operational theme of the day - they cannot simply trade fire evenly across the front. They need to use their infantry mass to widen the battle, stretch the Coalition line, and create pressure in several sectors at once. Once the Allied front is extended, French numbers can create local superiority.
The Guard is the key variable.
It is effectively unbreakable in a direct contest, and I cannot reasonably expect a favourable outcome in any sector where it is committed in strength.
The opening position at Bautzen presents the first Allied problem.
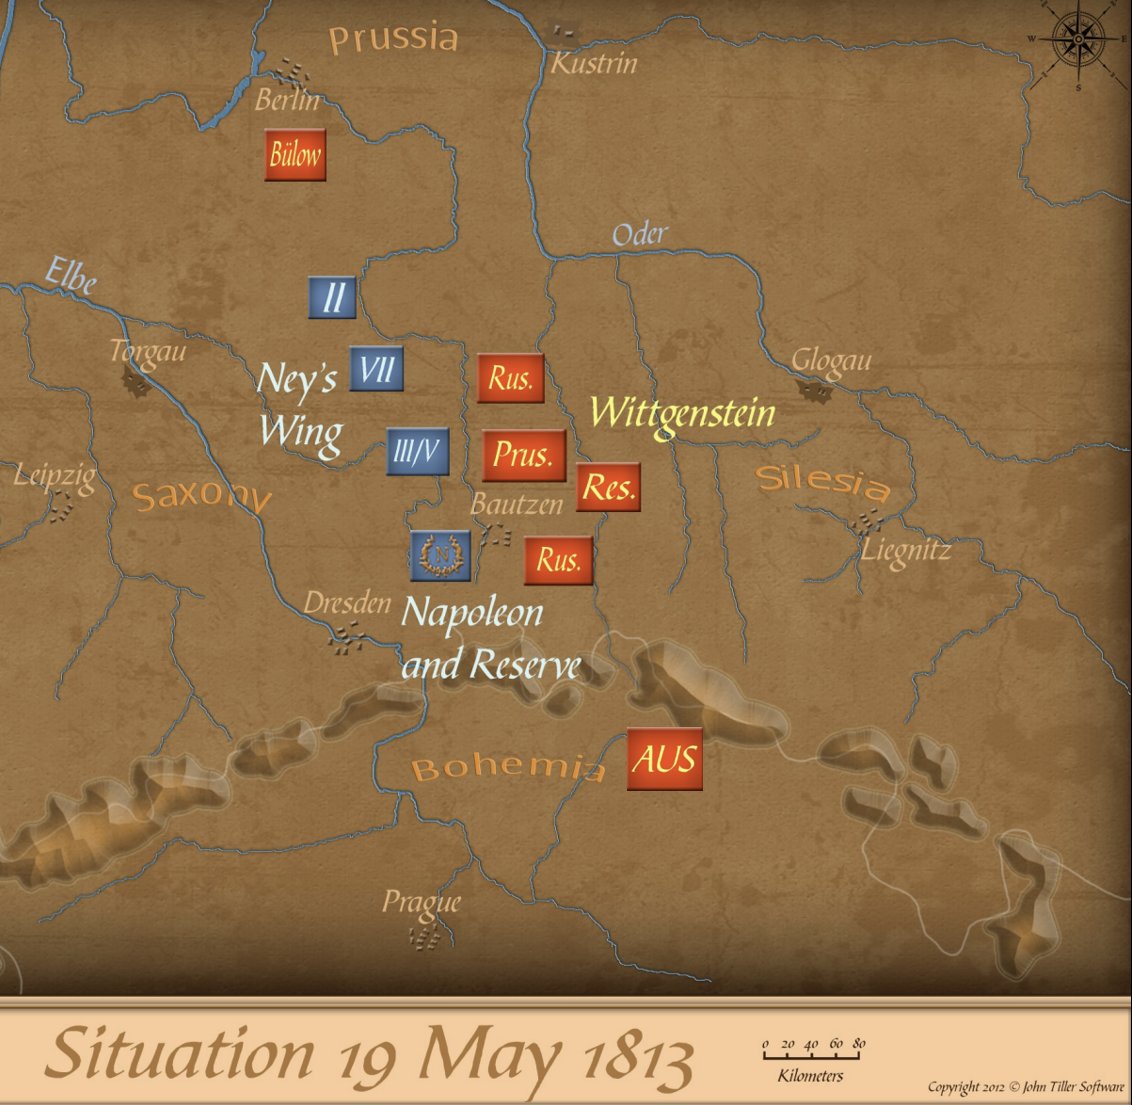
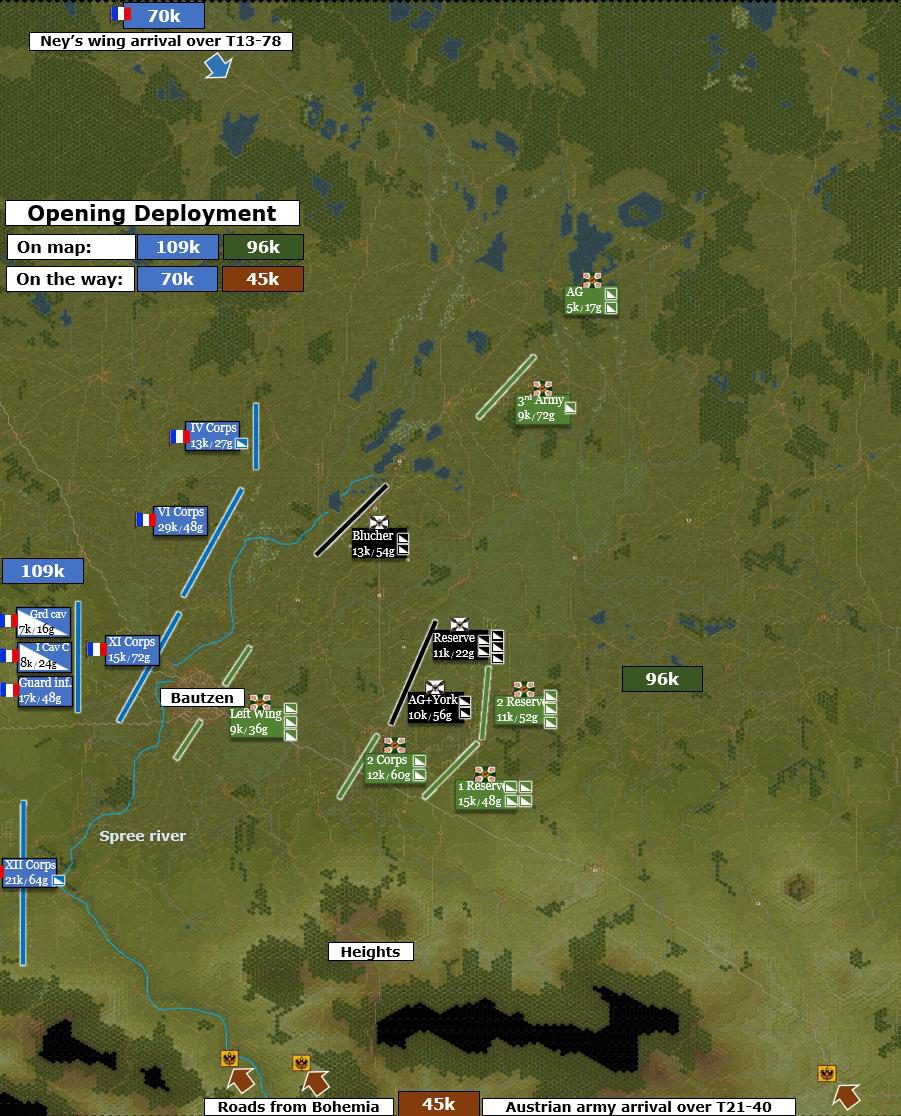
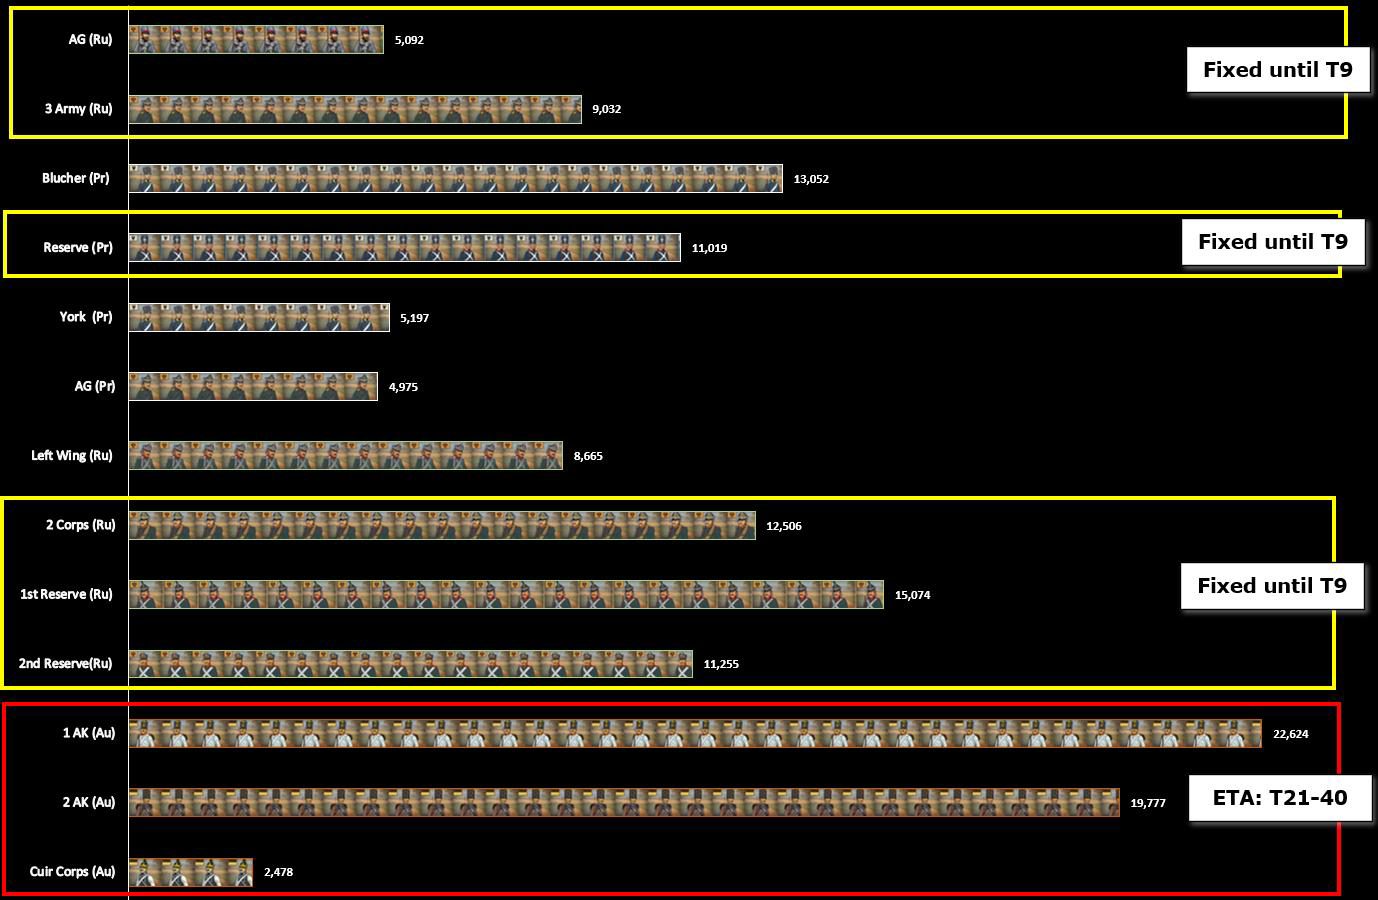
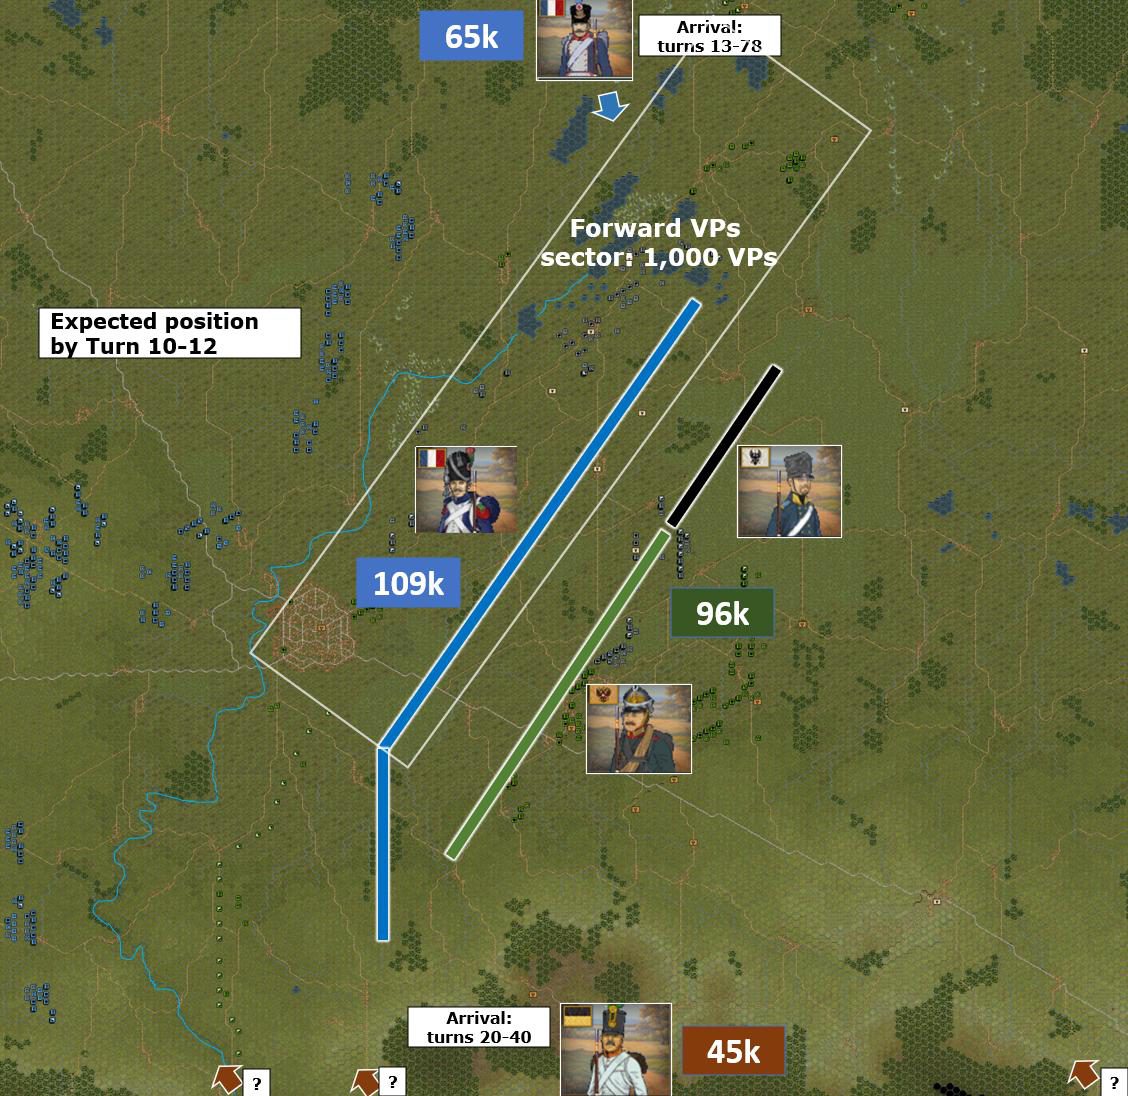
The Coalition army is not yet ready to fight as a single force. Although around 96,000 Allied troops are on the map, most of them are fixed for the first two hours. Only the forward formations — roughly 30,000 men under Blücher, the Prussian Advance Guard, and the Russian Left Wing — are free to act immediately.
Opposite them, the French begin with around 109,000 men on the map and a much larger first echelon (~80,000) available for immediate movement.
(on the image each allied cavalry box representing ~1,000 cavalry)
The Allied deployment is divided into two very different parts.
The forward echelon is thinly spread along the Spree and around Bautzen. It is exposed and outnumbered. It cannot hold against the main French body for long.
The main Allied body is positioned farther to the rear, closer to the eventual central position, but remains fixed until Turn 9. This means that for the first two hours the Coalition has limited freedom of action. It can observe, delay, and withdraw, but it cannot yet mount a coordinated response.
The Austrians are expected to enter from the south between Turns 21 and 40. In theory, this should strengthen the Allied left and help balance the French numerical advantage.
In practice, their arrival creates uncertainty.
1 AK, 2 AK, and Nostitz's Cuirassiers may each arrive on one of three possible roads from Bohemia. Allied Headquarters knows that Austrian help is coming, but not exactly where it will appear.
This matters because the Allied left is exposed to French movement from the west and south-west. If the Austrians arrive close to the main army, they can reinforce the line. If they arrive too far away, they may be separated, isolated, and forced to fight before they are properly concentrated and with compromised command chain.
The Austrian arrival is therefore not simply a reinforcement schedule. It is an uncertainty problem.
The French begin with 109k troops on map and with further 65-70k of Ney's wing to arrive gradually on the far-right flank of the Allied army and expected to reach the battlefield steadily through the 21st of May from Turn 45-50 onwards.
The Imperial Guard and most of the 1st Cavalry corps of the French army begin the battle fixed until turn 9, with 80k troops unfixed.
From Coalition perspective - this means the battle has two clocks.
The first clock is short: the Coalition forward screen has to avoid battle at the opening two hours until its main army becomes active.
The second clock is longer and more dangerous: the Coalition must achieve something useful before Ney's arrival gives the French a much larger numerical advantage.
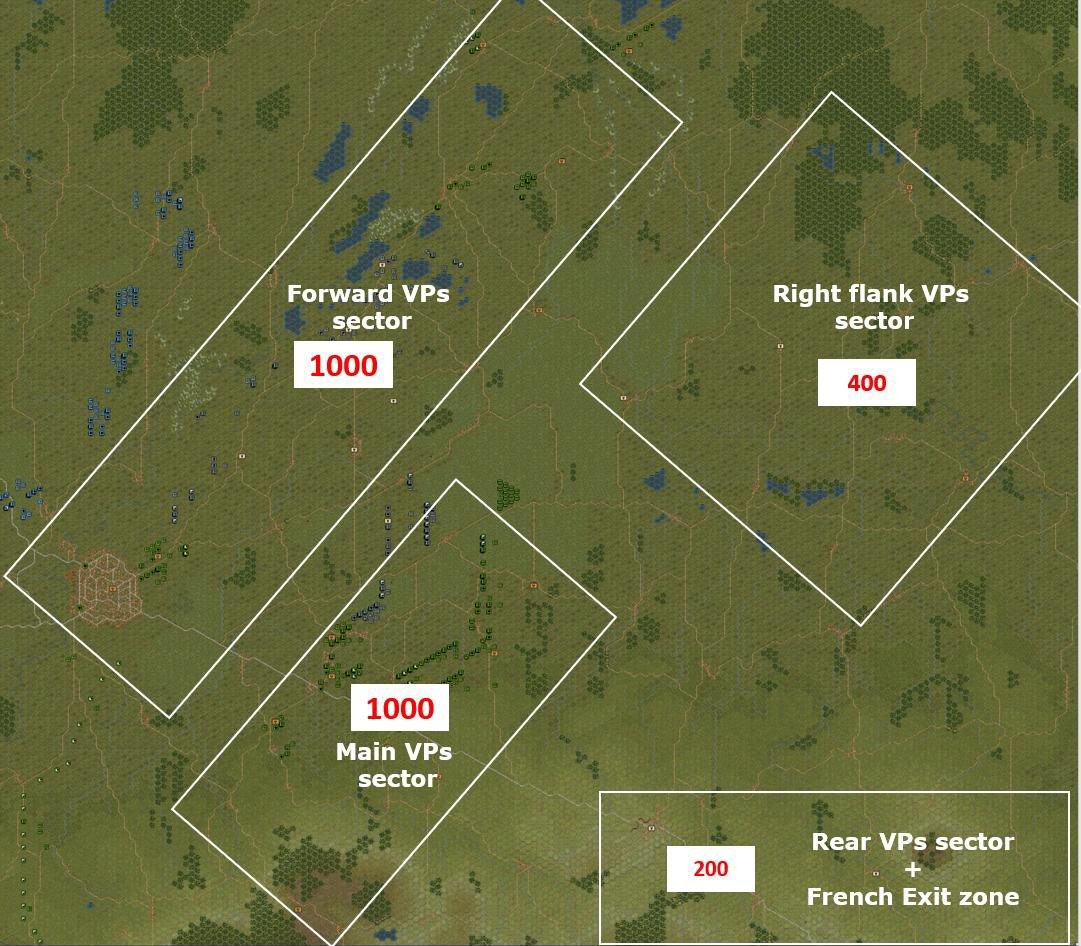
The VPs can be roughly divided into four sectors:
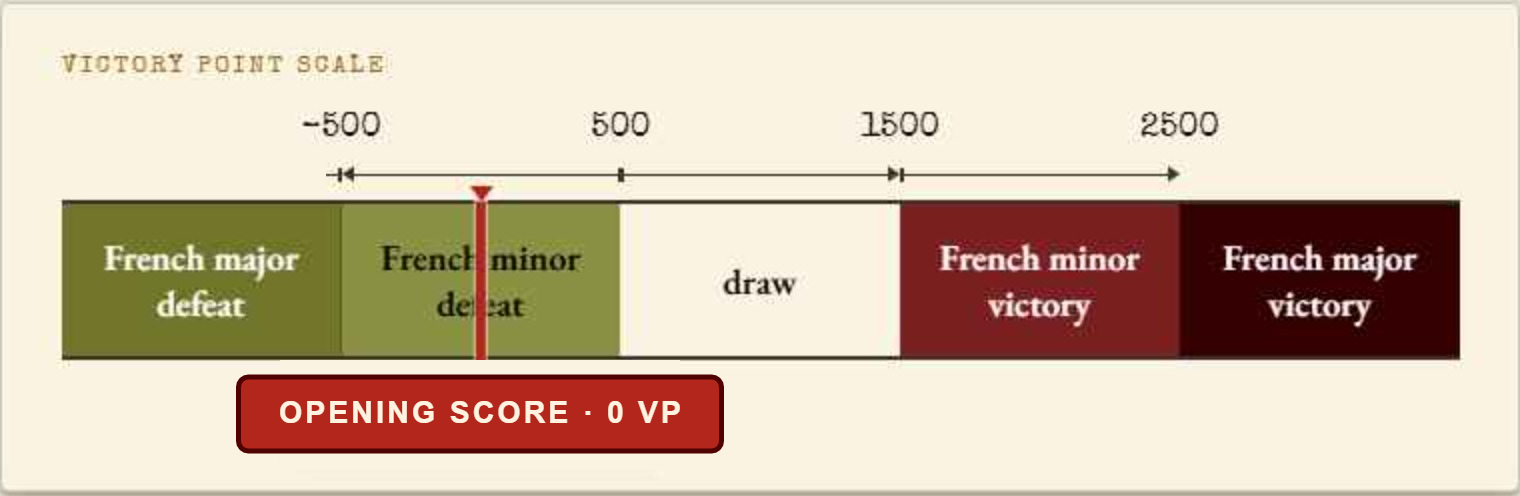
The forward sector is almost impossible to hold in the opening phase. Losing it will immediately shift the score by 1,000 VPs in favour of the French and move the battle toward the centre (solid Draw) of the scoring spectrum.
If the Allies also lose the right flank sector (-400 VPs), the French will hold around 1,400 VPs, close to the threshold for a French minor victory.
If the main sector is lost as well, the French will reach roughly 2,400 VPs, bringing the Allies close to a major defeat.
This means the Coalition cannot simply retreat indefinitely.
The forward sector can be sacrificed. The main sector cannot.
A major Allied victory seems unrealistic, as it would require holding all VPs across a wide front while also inflicting much heavier losses on the French army.
The opening position gives Allied Headquarters three conclusions.
First, Bautzen and the Spree line cannot be held. The forward troops are too exposed, and the main army is not yet free to support them. The Forward VPs sector cannot be held initially and it has to be given up. This will push the Victory score by 1,000 VPs in favour of the French, straight to the middle of the scoring spectrum and a solid Draw.
The opening orders for the allied formations of the first echelon should be to evacuate Bautzen and the positions along the Spree River and to retreat to the rear leaving some cavalry pickets to observe French movements. Accordingly, the expected position of the armies around Turn 10-12:
Second, the Allied army must consolidate around the central position (at the Main VPs sector) and to improvise based on what the French are doing.
Third, the Coalition cannot afford to become passive. A purely defensive posture across a wide front will eventually allow French numbers to tell, especially once Ney's wing begins to arrive.
The first phase of the battle is not about holding ground.
It is about preserving the Allied HQ freedom to decide what kind of battle Bautzen will become.
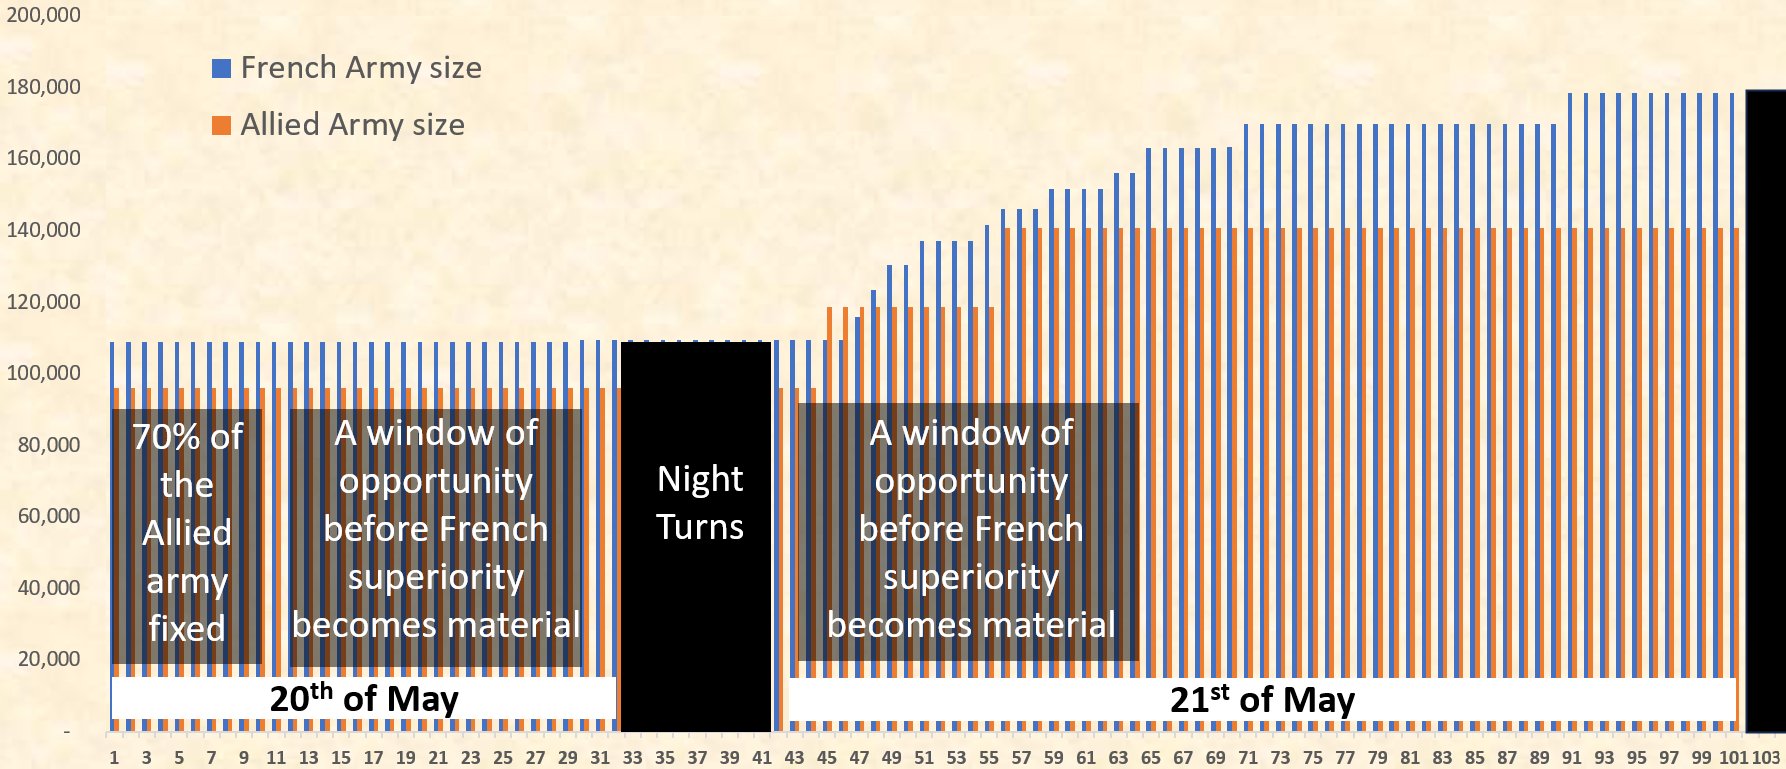
Taking into account the reinforcement schedule, the below chart visualises the balance of forces over 104 turns, assuming the meeting point at the Main VPs sector and taking into account the timing of the reinforcement schedule:
Once the bulk of the allied army becomes unfixed on Turn 9 on the 20th of May, there are 24 turns until nightfall. A decision needs to be made what should be done over this time window, while the French superiority in numbers is not yet material.
On the morning of the 21st of May, both sides will receive reinforcements creating a narrow window of opportunity for the Allied side of around ~20 turns where the overall balance of forces is roughly on par.
Starting from turn 65, it's all downhill for the Allied army as more French reinforcements will arrive.
Ney's wing. It arrives on the Allied far right and threatens to change the entire geometry of the battle. Once Ney begins to influence the battlefield, the French can stretch the Coalition front from both directions.
This creates a narrow Allied window.
For part of the morning on 21 May, the overall balance of forces may still be roughly manageable. But from around Turn 65, the arrival of further French reinforcements begins to make the situation progressively worse for the Coalition.
Strategically the operational choice for the allied army can be narrowed down to:
With this dilemma in mind, let us turn to military theory. In Napoleonic warfare, one can roughly identify several recurring defensive styles.
Positional Defense is the simplest form: hold a strong line and force the enemy to attack it. Its strength lies in making frontal attack difficult. Terrain is central - ridges, chateaus, streams, reverse slopes. Waterloo is the classic historical example. Ridge defense at Wagram from the previous AAR is a good WDS series example of positional defence at Napoleonic wars.
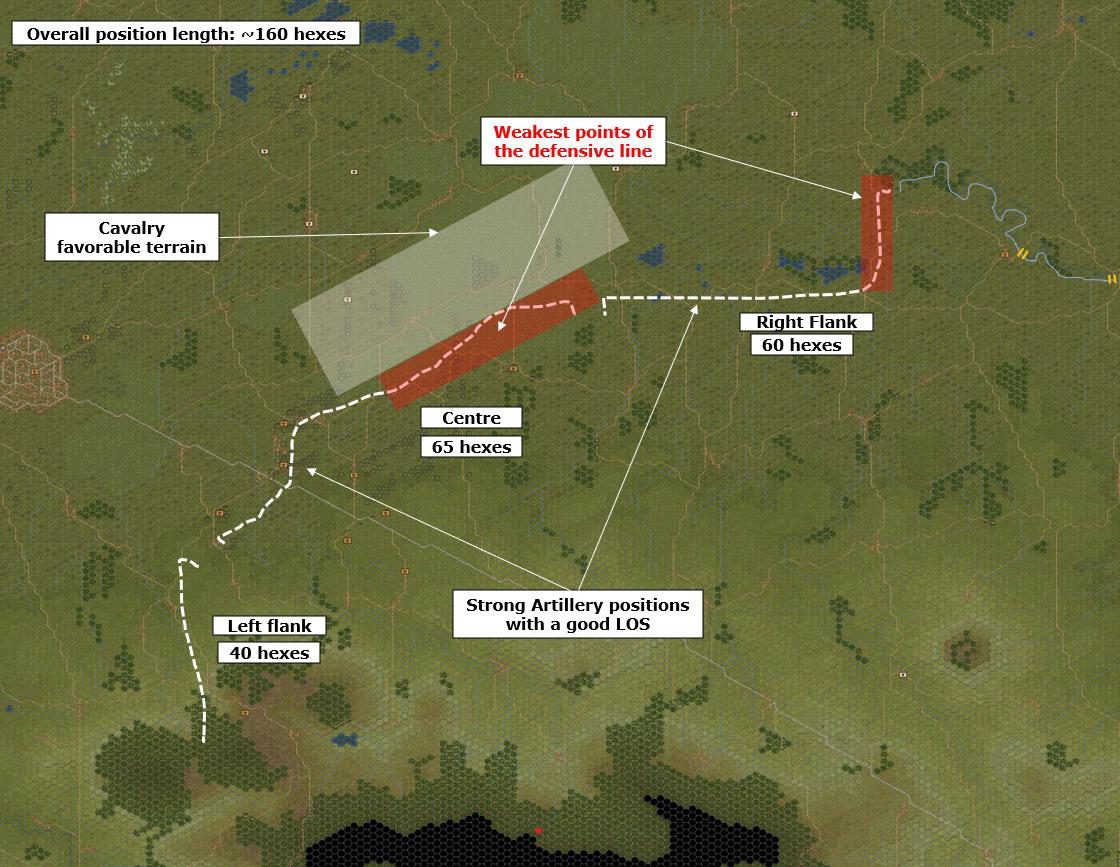
I made an effort to identify a suitable position where I could possibly hold the French advance until the Austrians arrive. One was identified in the middle of the map covering the Main VPs sector:
However, this is where the good news stops as:
These details make the choice of positional defence very questionable as the Bautzen battlefield is too wide and lacks the ground needed to anchor such a line. Furthermore, as opposed to Waterloo or Wagram the French have plenty of time to outflank my army which Ney failed to achieve historically – however I cannot rely on my PBEM opponent to make the same mistake.
Defense in Depth is usually set up across a narrow front with secured flanks. Forward line delays, the main line absorbs, and reserves restore the situation or counterattack. Borodino is a good example: earthworks on the Russian left flank and the central redoubt as a forward position, the Semenovskaya village ravine as a fallback position, and the reserve position to which the Russian army was pushed toward the end of the battle.
The Battle of Ligny AAR is a good WDS example of defense in depth: I used this set up with the forward position at the village of Wagnele on the right and St. Amand in the center, falling back to the main defensive line behind once the enemy pressure became unbearable. However, unlike at the historical battle of Borodino or in the PBEM Ligny AAR, at Bautzen the army lacks both the numbers and the terrain to be positioned in such a way.
Furthermore, in the examples above (Waterloo, Borodino historical battles and Wagram, Ligny AARs), the attacking side had limited opportunity to outflank the defender's position. At Bautzen, the French player has both the time and the space on a wide map to outflank any Allied position.
Active Defense is defensive overall but aggressive locally with local and spoiling attacks to disrupt the enemy. The Battle of Leipzig is a good historical example. In this PBEM Quatre Bras AAR the Allied player demonstrated active defence, aggressively counterattacking the French right and centre while also launching his own offensive against the French left flank later in the battle.
Offensive Defense goes further: the defender receives the attack in order to launch a decisive counterstroke, creating local superiority at the vital point once the enemy is committed. Austerlitz is the classic example - defense used as the setup for offense.
Considering that the Allied army has no choice but to cede a lot of ground at the beginning pushing the victory score to the Draw, I am leaning towards Active or Offensive Defence options. At least it gives me a chance of victory vs just ceding the initiative and sitting still waiting for the French mass to crush one of my sectors eventually.
The Allied army is materially weaker in infantry and my assessment is that I cannot afford to sit across a wide front indefinitely. Sooner or later the French superiority in numbers will find a spot in the line where overwhelming French superiority will be achieved.
Accordingly, the answer may not be to “defend” in the passive sense. It is closer to active defence, or even offensive-defence.
The Allies must hold in one sector, strike in another, and try to reshape the geometry of the line. The aim is to force the French to react, shift reserves back and forth, and lose the benefit of their wider front.
If this works, the Coalition can concentrate locally and create temporary superiority before French numbers mature into an overwhelming advantage.
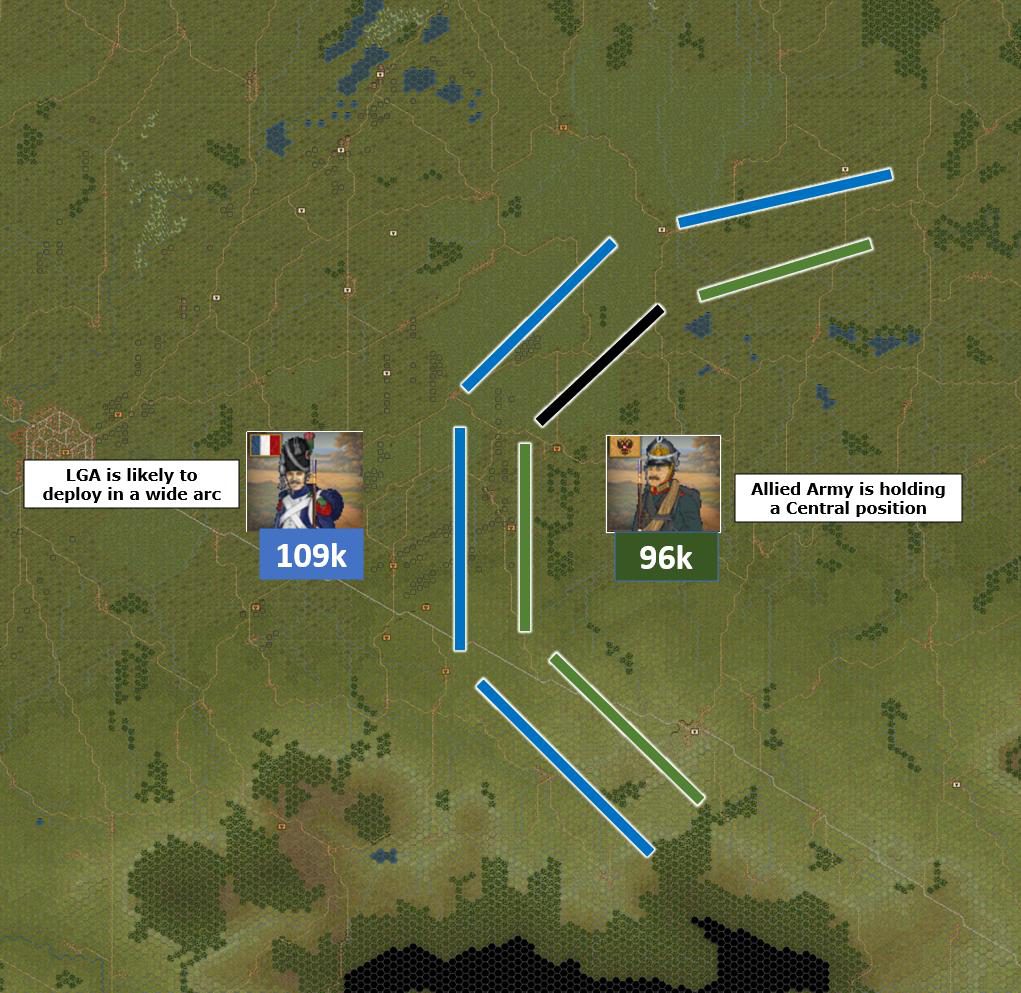
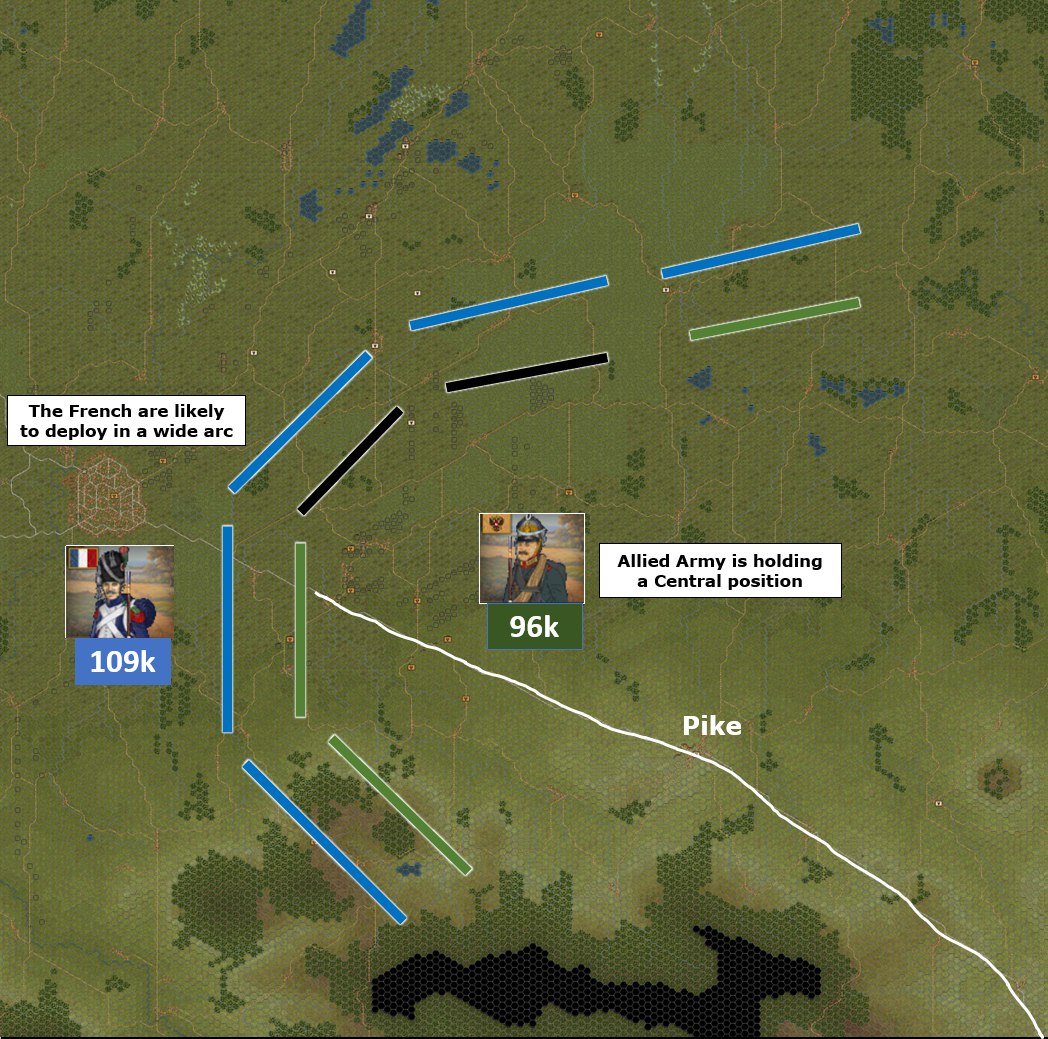
The Allied army holds a central position, supported by a useful road network and a rear pike running behind its left and centre. This allows rapid concentration between sectors. The French, by contrast, are likely to operate on a wider outer arc.
This difference matters. French corps can advance across a broad front, but the wider they spread, the harder it becomes for them to support one another.
Command and control is another factor. If the French line becomes too extended, some corps on the flanks may fall outside Napoleon’s effective command range, reducing their reorganisation ratings to around 50%. The Prussians and Russians, by contrast, have independent command structures and high reorganisation ratings of around 80%.
The central position is therefore not just a defensive line. It is the key element of the Allied strategy for the day. From this position, the Coalition can consolidate its army, observe the French advance, and shift reserves quickly if the enemy becomes stretched.
With this in mind, the initial Allied plan has two phases:
Tactically, I need to find a ground for the Allied strike where two conditions are met:
While the first condition is beyond me and it is totally in the hands of my opponent, I should not be hesitant once the opportunity presents itself and both conditions are in place.
At the lower tactical level I need open ground to threaten the French infantry and force them either to form squares or to mass into large stacks of 1,500+ men.
Both of these formations are vulnerable to artillery. So my aim is to create situations where the French are forced into squares or tight formations, and then hit them with concentrated gunfire and infantry formed in line and skirmishers.
Much of the French infantry consists of raw recruits with poor musketry and Quality D morale, so they are unlikely to stand for long under fire. Also, they will struggle to inflict serious damage on my cavalry with musketry.
The key indicators to watch and gather intelligence on:
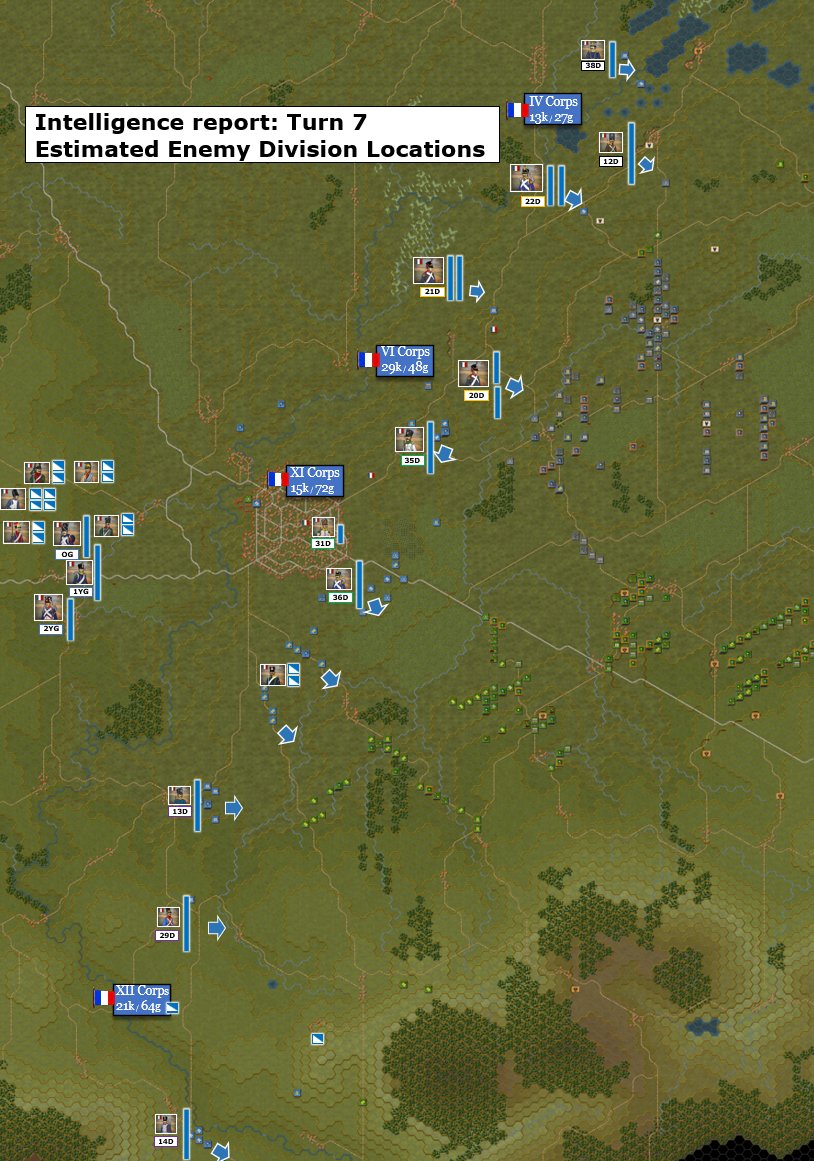
The plan therefore requires continuous reassessment. I have to keep reading the enemy deployment as it develops. To achieve this, Cossack pickets were to be deployed across the front to observe enemy movements. This way I can track French divisions mapping them by their distinct uniforms on my staff map [PowerPoint is used – refer to General Staff section of the Napoleonic articles for further details on this].
Putting myself into the shoes of the French HQ there are multiple strategies which can be implemented:
Each option has its pros and cons. I have no idea what the enemy will do, however knowing the cautious style of play of my opponent, my expectation is that the French would avoid unnecessary risk early and choose the Safe play option.
In such case the Allied plan had to be ready to improvise on the go.
Allied Forward elements evacuate Bautzen and the Spree river line falling back to consolidate at the central position.
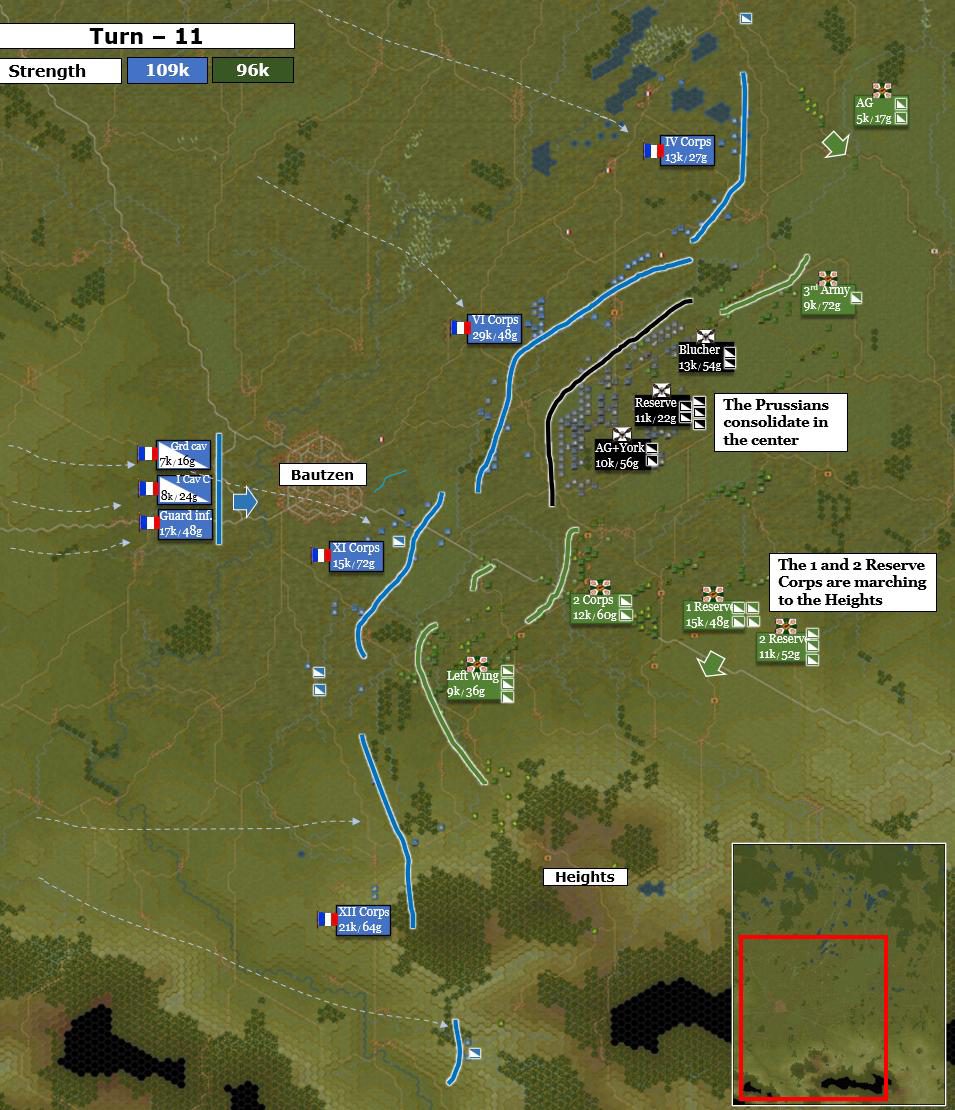
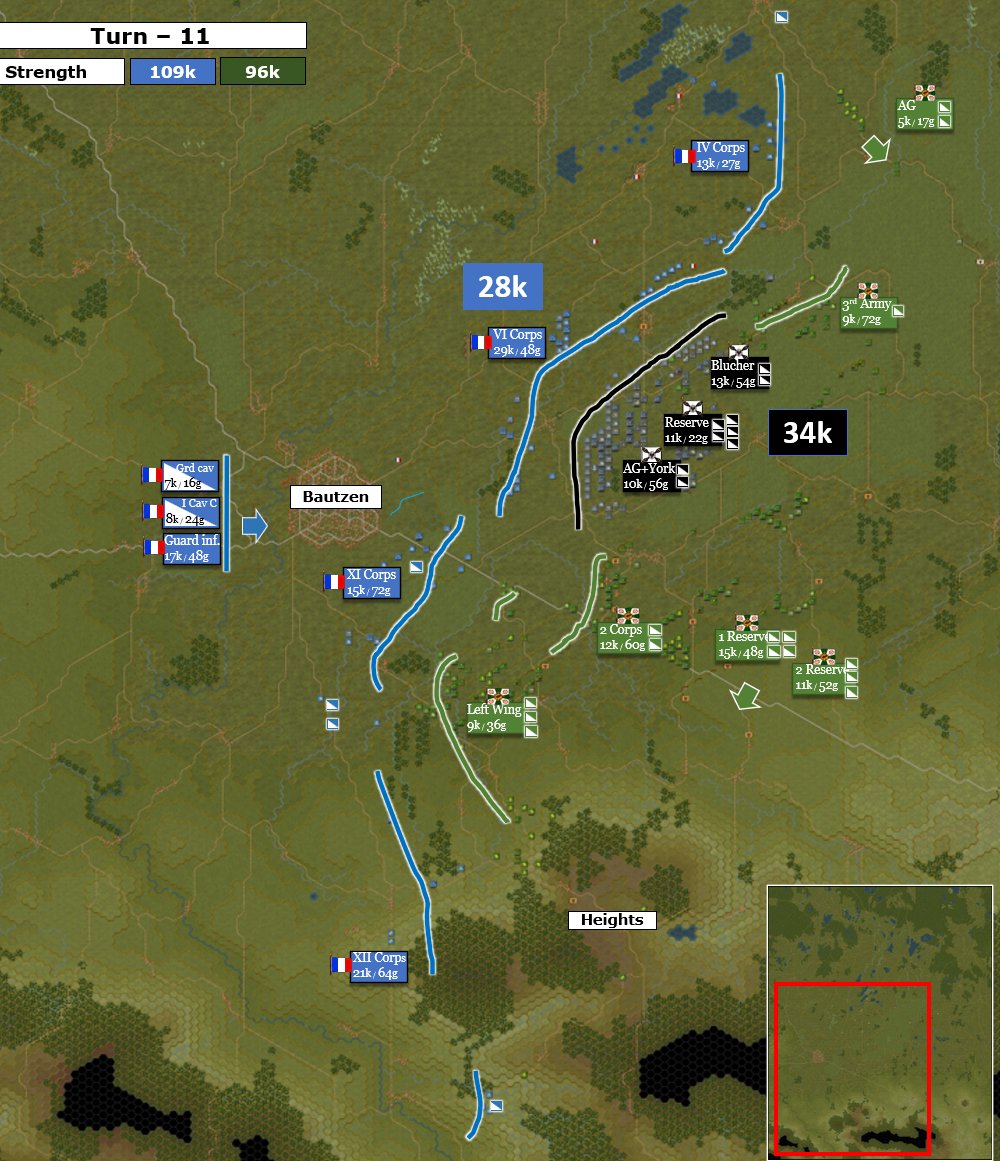
Situation as of Turn 11:
The first two hours opened with the French advancing aggressively across the wide front:
French right:
Centre:
French Left:
I am proceeding as planned - the outnumbered forward elements of the Allied army retreated towards the main body.
Overall, the first phase is achieving its purpose.
The army remains intact, the main body is now active, the Prussians are consolidated in the centre and the French advance is beginning to reveal the shape of the battle with a material force marching to capture the heights on the far-left flank of the allied army.
As a response, both Reserve Corps of the Russian army are sent to the Allied far left towards the heights to counter this move. Not ideal force allocation as Russian heavy cavalry is hardly suited for such terrain but no other outfits are in position to march there.
From the zip file, open !BautzenAAR Turn 11_password_7577 and watch the enemy movements from the Allied perspective.
By turn 12, the situation was unfolding better than expected. The French advance was broad, increasingly stretched, and lacking cavalry support.
The Allied withdrawal has preserved the forward formations, and the Prussians are now concentrating around the centre along the shorter interior arc, while the French corps drifted further apart.
Then an opportunity emerged.
The wide arc of the French advance had left VI Corps without effective support from its neighbouring formations.
To its right, XI Corps had pushed south and was now too far away to provide immediate assistance. Its weakest formation, the 31st Division, numbering approximately 2,200 men, was deployed adjacent to VI Corps and was covering the approaches to Bautzen.
To its left, IV Corps was advancing across an extended frontage, with the bulk of its forces still several hours away.
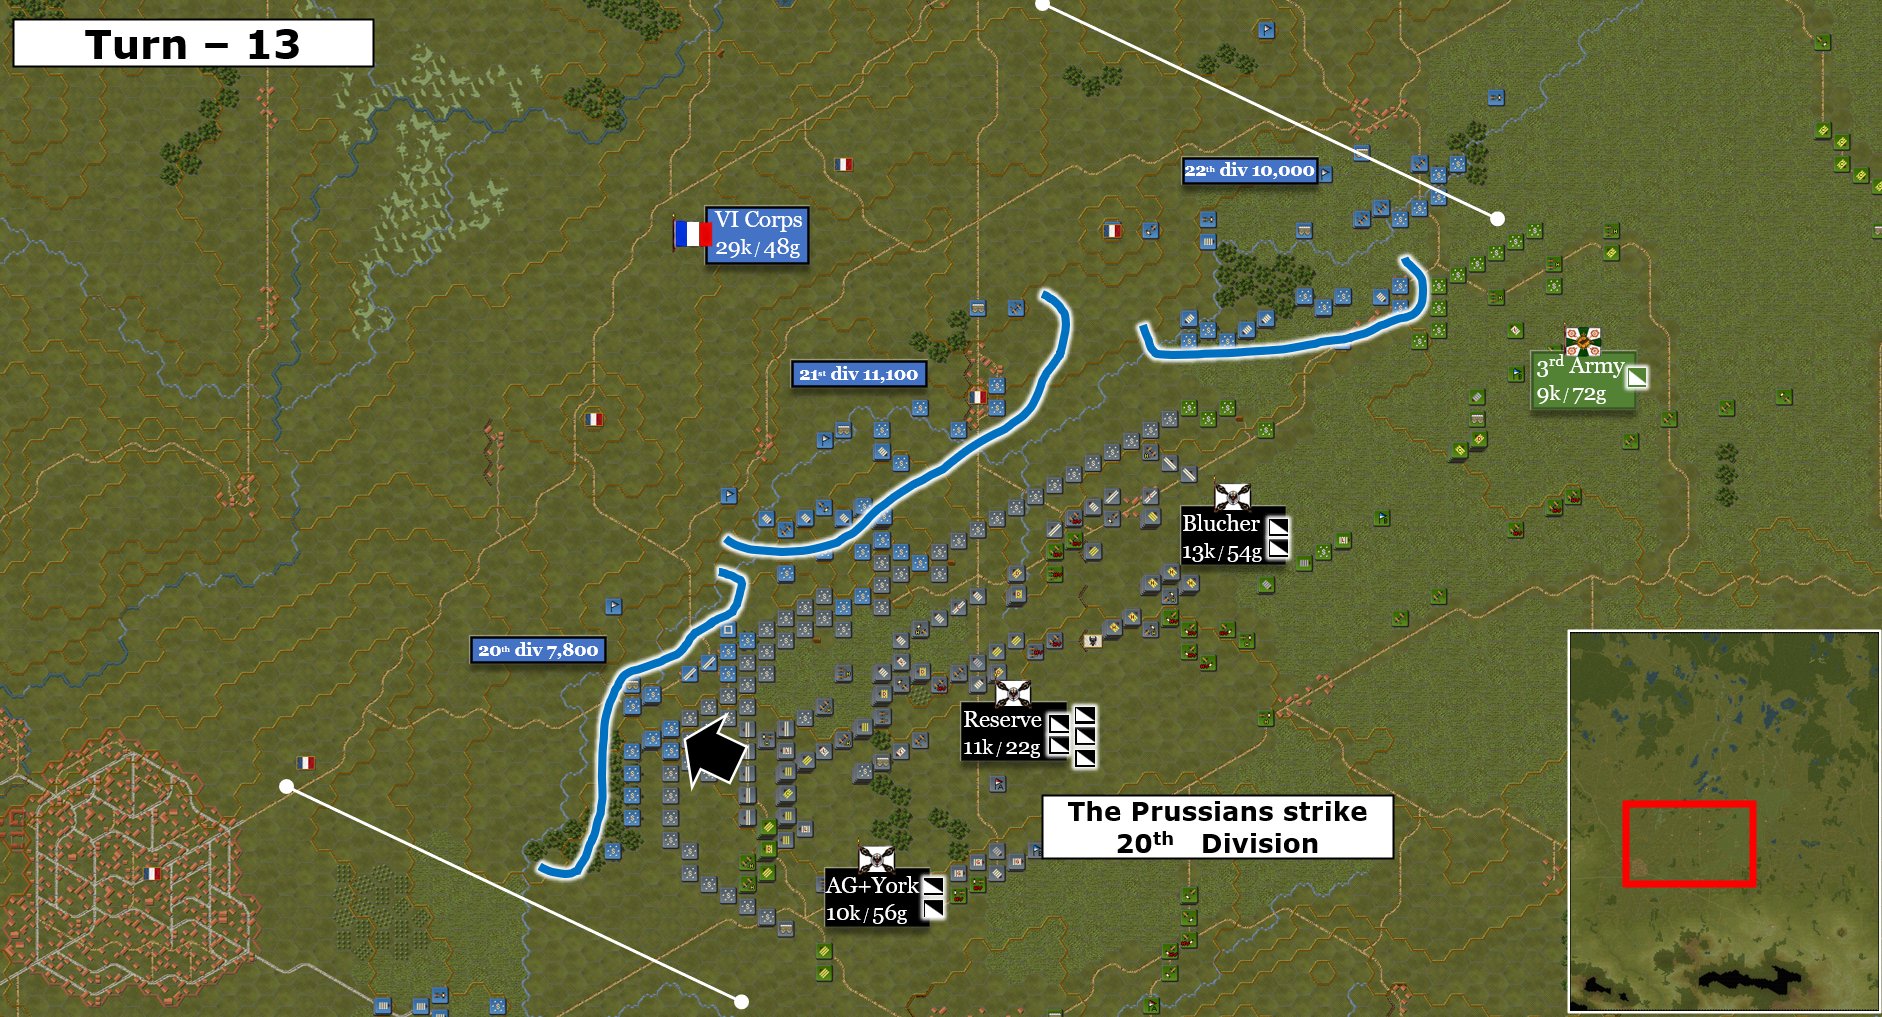
Most importantly, VI Corps itself was dispersed across a frontage of almost 50 hexes and had no cavalry cover. Its divisions were now entering the open ground around Niederkaina and advancing directly against a concentrated Prussian force.
It was time to react. The Prussians begin shifting against the front of VI Corps, creating a local superiority of around 34,000 against 28,000. While the numerical advantage itself was not decisive, the Prussians had superior unit quality and reorganisation ratings — and, most importantly, close to 8,000 cavalry against a French corps with virtually none.
Elite Prussian skirmishers surged forward in dense swarms, slowing the French advance and screening the deployment behind them. Horse artillery galloped into position, unlimbered at close range, and opened fire on the advancing French columns.
The first blow fell on the French 20th Division. Advancing without cavalry cover and already stretched across open ground, it found itself under converging pressure from skirmishers, artillery, and cavalry. French attempts to clear the Prussian screen failed, while Prussian cavalry repeatedly threatened exposed infantry and forced the division to give ground, cutting down a number of French skirmish companies.
The French advance stalled and the 20th Division began falling back in disorder.
From the zip file, open !BautzenAAR Turn 14_password_Dino and watch the Prussians commencing their attack.
Rather than becoming fixed against the retreating French, the Prussians shifted the weight of their attack.
The elite Brandenburg Reserve Corps turned against the French 21st Division and recaptured Kreckwitz. The same combined-arms pressure was now applied against a fresh target. Artillery disrupted the French line, cavalry dominated the open ground, and the Prussian infantry pressed forward before the division could establish a stable defence.
Open !BautzenAAR Turn 16_password_Dino and watch the Prussians shifting their effort and attacking the village of Kreckwitz. There is only one French battalion covering the 15 hexes frontage between the 21st and 22nd Divisions.
By Turn 18, both the 20th and 21st Divisions had been driven back in disorder and were attempting to form a new defensive line on the high ground behind the stream.
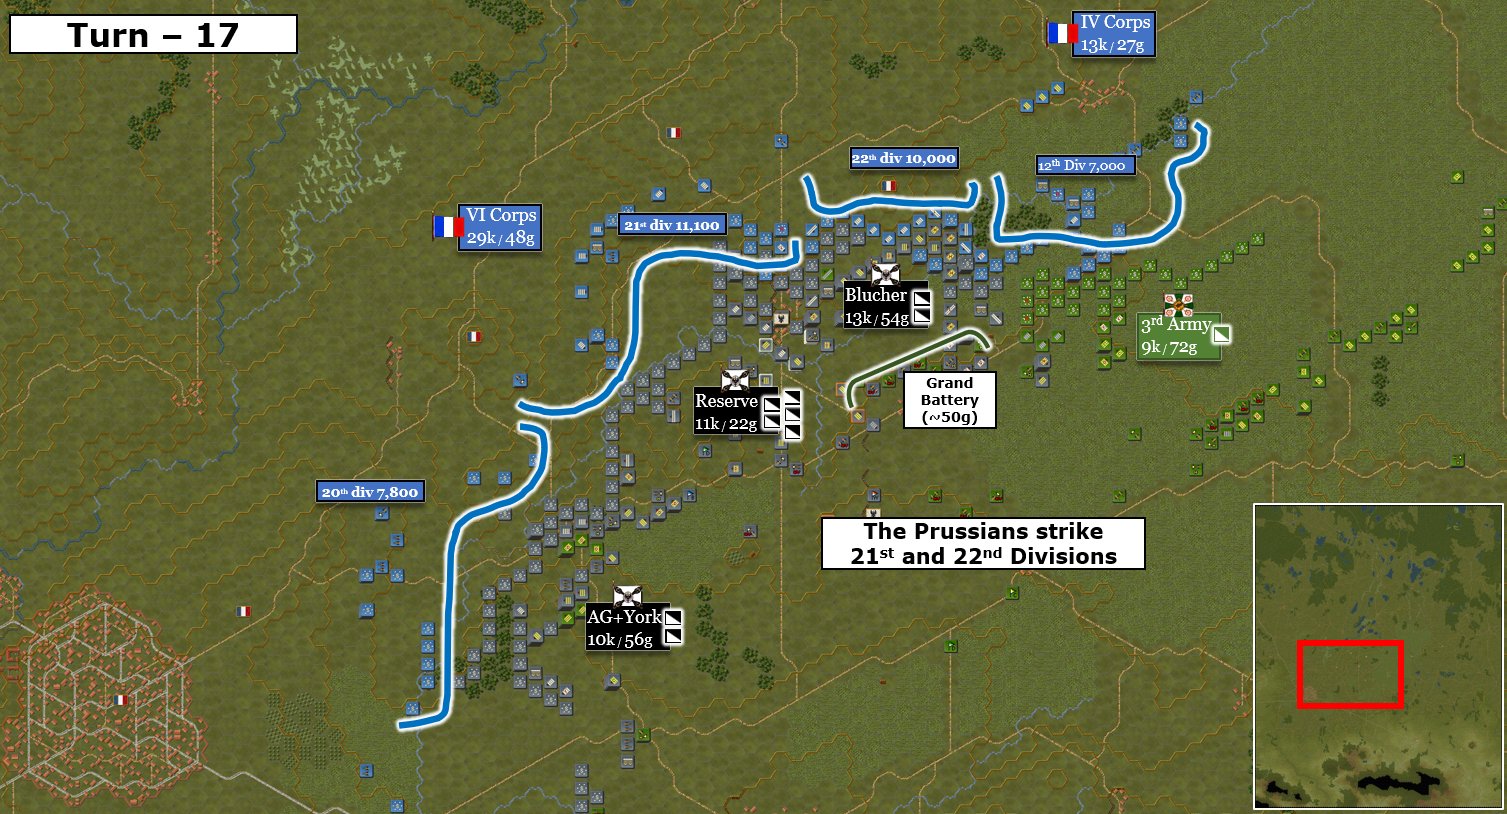
Leaving Yorck's Division and the Advance Guard — around 10,000 men in total — to contain the battered French formations, the main Prussian force shifted its effort once again.
This time the target was the French 22nd Division.
At the same time, the Russian 3rd Army, around 9,000 strong, pushed the neighbouring French 12th Division out of Purshwitz, reducing the immediate threat to the Prussian right flank and allowing the attack to continue.
The Prussians assembled a grand battery of around 60 guns against the 22nd Division. Under cover of this fire, infantry and horse artillery moved forward while the cavalry pressed against the French line in the open. The inexperienced French troops, many of them Quality D conscripts, struggled to maintain cohesion under the concentrated pressure.
Then another opportunity appeared.
A gap had opened between the French 21st and 22nd Divisions.
Open !BautzenAAR Turn 18_password_Dino and watch the Prussians exploiting the gap with cavalry and skirmishers.
Prussian lancers immediately exploited it, pushing through the opening and turning the flank of one French regiment. At the same time, elite cuirassiers attacked from the opposite direction.
The French position was now being compressed from both flanks.
Two battalions and two batteries — 12 guns in total — were isolated from the rest of the division and later eliminated.
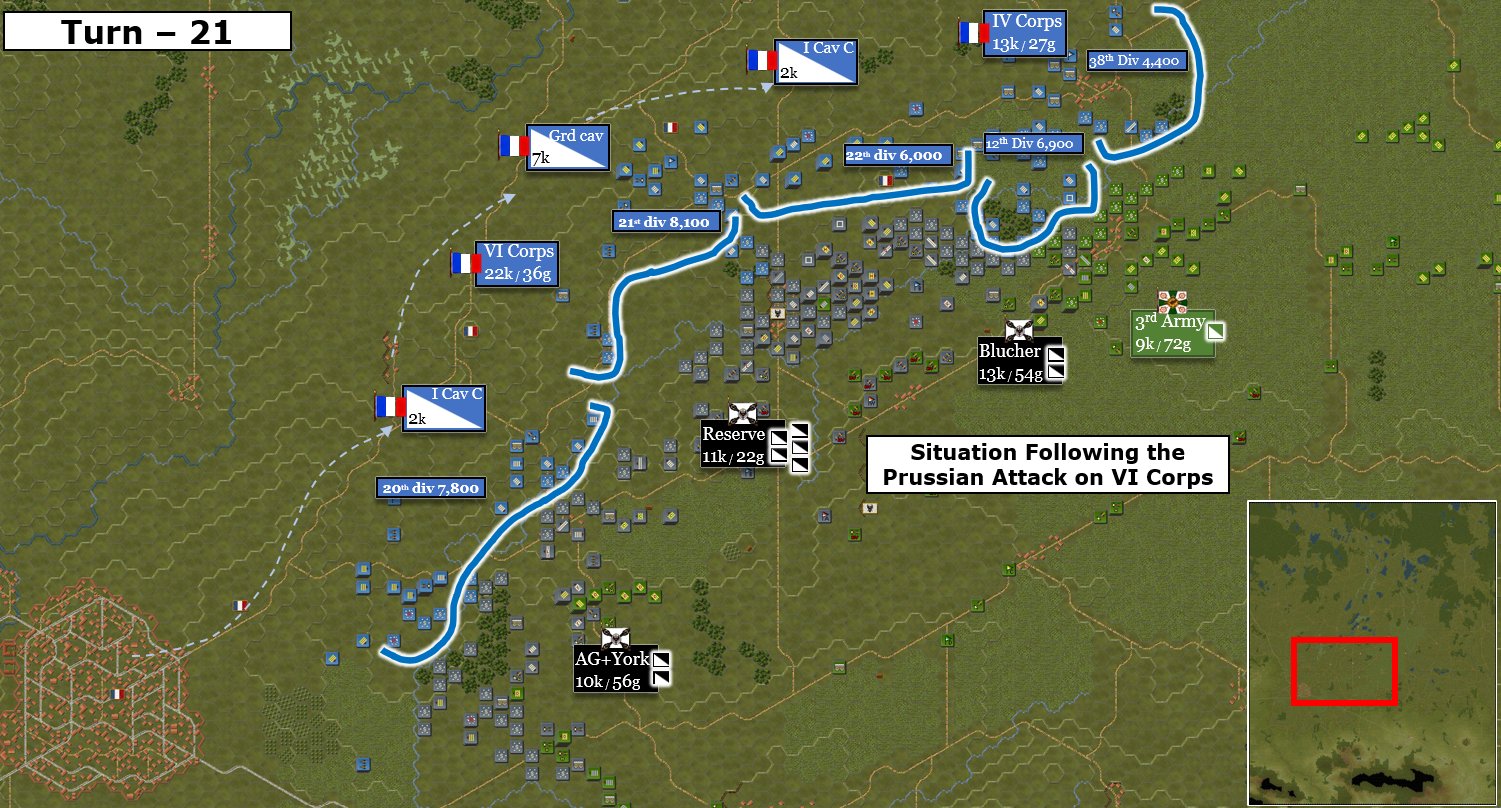
By Turn 21, VI Corps had effectively ceased to function as a coherent attacking formation. Its divisions had been struck one after another before the corps could recover cohesion or receive meaningful support from its neighbours.
The key to the action was not simply numerical superiority. The Prussians had used the shorter interior arc to shift the point of concentration faster than the French could rebuild their line.
First the 20th Division was stopped.
Then the weight of the attack shifted against the 21st.
Then, before the French front could recover, it shifted again against the 22nd.
VI Corps had entered the battle as a corps of nearly 29,000 men. But once its divisions became separated across the wide frontage, they were forced to fight largely one at a time.
The opportunity, however, was now disappearing.
By Turn 21, French Guard cavalry and heavy cavalry from I Cavalry Corps — an estimated 10,000 elite horsemen — were arriving to stabilise the sector. At the same time, the Prussian formations themselves needed time to reorganise after two hours of continuous fighting. Units had become intermixed, many were disordered, and any further advance against fresh French cavalry would have exposed the forward artillery and infantry to unacceptable risk.
Open !BautzenAAR Turn 21_password_Dino. The Prussians are now ceasing their attacks and switching to a defensive posture. The Allied grand battery can be seen next to Litten village.
The same conditions that had made the attack possible — French isolation and the absence of cavalry support — no longer existed.
I therefore halted the offensive and withdrew to the original positions behind the protection of my Grand Battery.
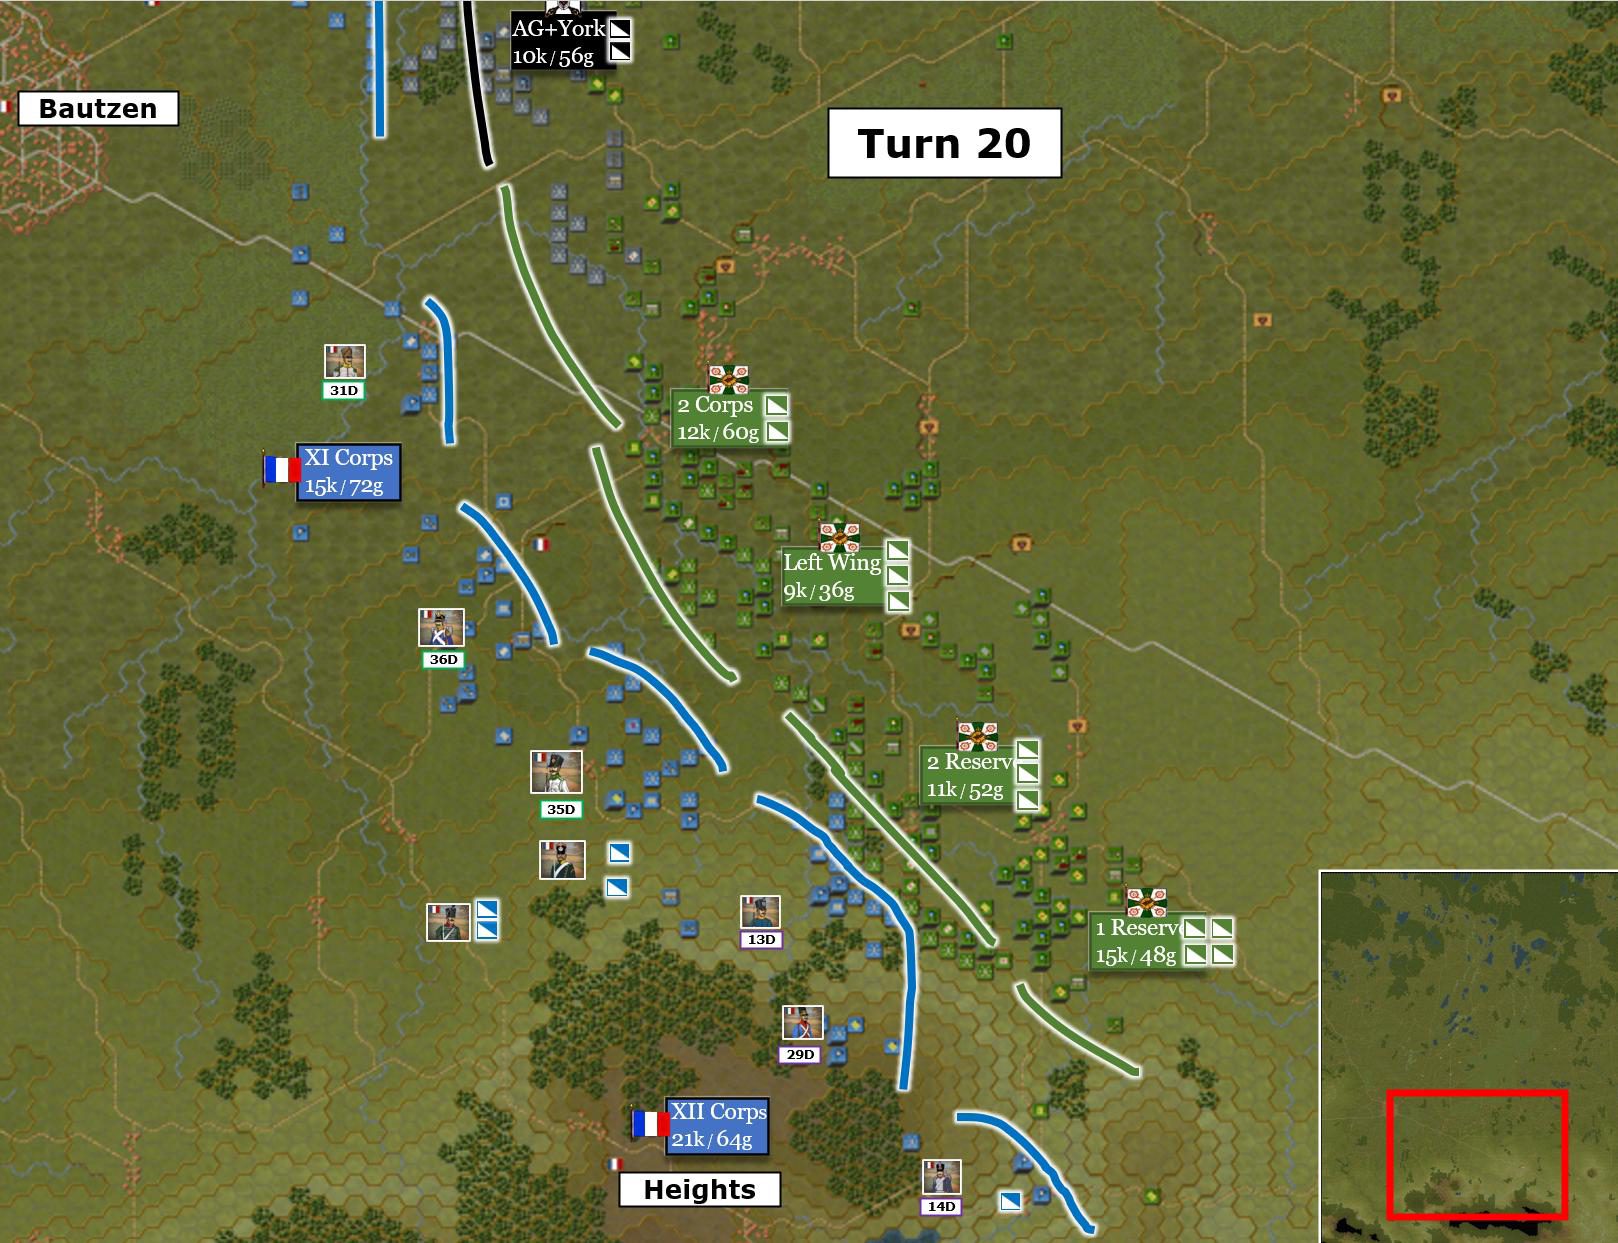
While events on my centre-right were developing favourably, the situation on the left was becoming increasingly concerning. The French advance was steadily widening around my flank, and the Bavarian infantry of the XII Corps were the first to reach the heights, securing a dominant position overlooking the sector. Situation on the Allied left-centre as of Turn 20:
The implications were serious.
Those hills controlled not only the surrounding approaches, but also threatened the Allied line of retreat and the connection with the still unarrived Austrian reinforcements. If Schwarzenberg entered through one of the western arrival zones, the French position on the heights could potentially separate the Austrians from the main Allied army before they had even deployed.
Both of my elite Reserve Corps of the Russian army were dispatched into the area in an attempt to contain the threat. However, the French had reached the high ground first. Their infantry was already establishing itself across the wooded ridgeline while my own infantry and artillery were still struggling to come forward. My heavy cavalry could only thrash a couple of Bavarian squadrons scouting ahead of infantry but eventually, lacking infantry support I had to pull back downhill.
In effect, the French had secured one of the key operational positions on the battlefield almost without a fight.
Operationally, the attack had achieved everything that could reasonably be expected. VI Corps had been badly mauled, the French timetable had been disrupted, and a substantial portion of Napoleon's cavalry reserve had been drawn into the sector to restore the situation. However, the conditions that had made the counterstroke possible—French overextension and the absence of cavalry support—were rapidly disappearing. Ney's infantry was approaching, the French line was becoming increasingly cohesive, and the opportunity for another success on the same scale had effectively passed.
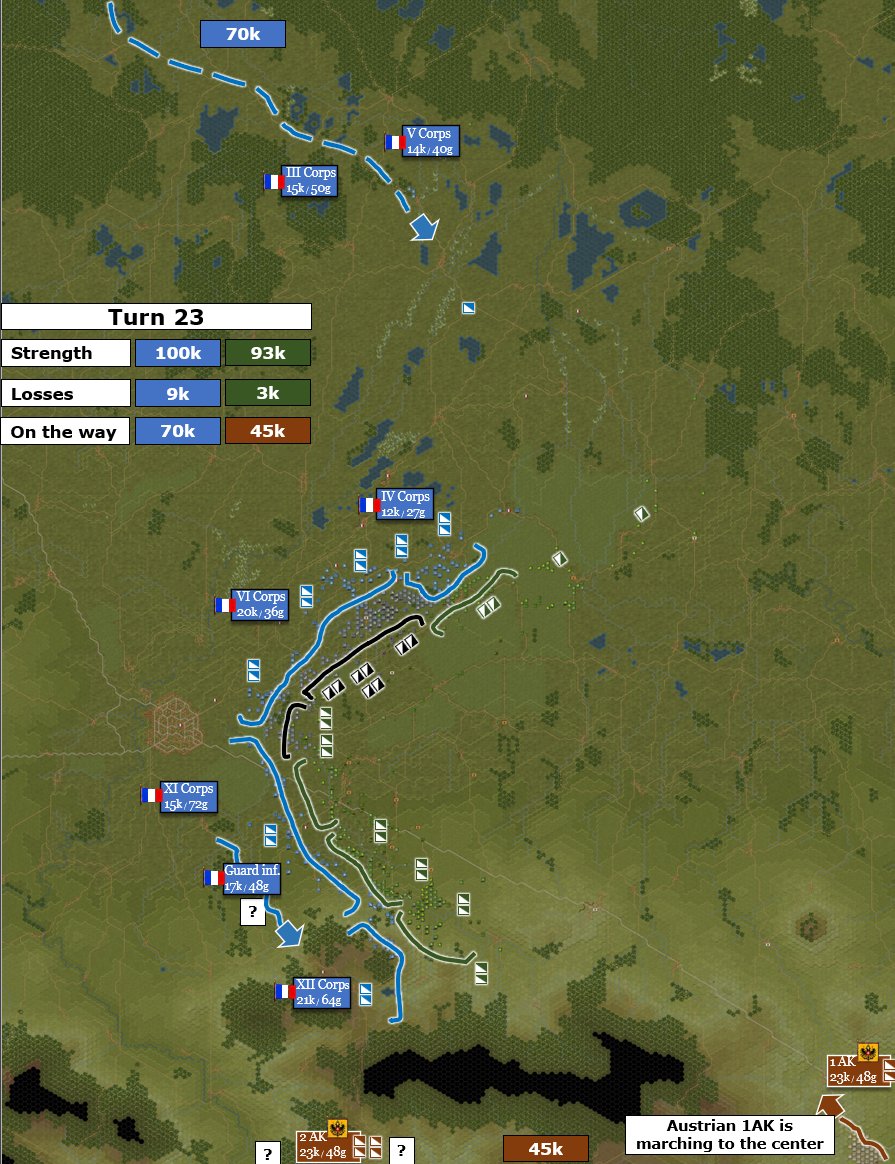
Overall situation as of Turn 23:
At 17:00 (Turn 21) Schwarzenberg along with his 1 AK arrived at hex 210:236 in the allied rear and about 10km away from the allied left flank.
The rest of the Austrian army remains uncertain. 2 AK and Nostitz's cavalry have not yet appeared. Their entry roads are still unknown.
The 1st AK is ordered to march along the pike toward the Allied centre. With darkness only 12 turns away, the Corps is expected to reach the Allied left by the early morning of 21 May, around Turn 42.
I am still undecided on how to deal with Ney. Two options are being considered.
1. Ignore Ney and continue the offensive against Napoleon's main army.
The first option is to continue attacking until nightfall and resume the offensive in the morning, while leaving only a delaying force against Ney. Even if completely unopposed, I estimate that his wing would not become a serious threat to the Allied rear and flank until around late morning – midday on 21 May, roughly Turns 60–70.
By then, the main battle may already be decided.
To delay Ney further, Cossacks from the Advance Guard can delay Ney while the main Allied army may have an option to withdraw quickly toward the exit zones along the pike. Ney, meanwhile, would have to advance through a network of secondary roads screened by Cossacks. In this scenario, his flanking march risks becoming a punch into empty air.
The operational objective would be to make Ney irrelevant by defeating Napoleon's main army before his wing can decisively intervene. In this sense, the battle would resemble a reversed Waterloo: the Coalition must defeat the French before Ney — playing the role of the approaching Prussians — arrives to change the balance.
2. Screen Ney and deploy 1 AK against him.
The second option is more conservative. A small force would delay Ney while 1 AK marches to the Allied right and occupies the defensive position identified earlier in Section 6 under the positional-defence option. (the right flank of the section 6 image)
Either course requires a force capable of slowing Ney's advance.
For this purpose, I formed a light detachment on the far right flank from elements of the 3rd Army: one infantry division (two line battalions, two light battalions), 15 Cossack sotnias, 12 cavalry squadrons, and four horse batteries — around 4,300 men supported by 24 horse guns.
Its mission is not to stop Ney, but to consume his time.
The detachment will demonstrate and form defensive positions, forcing the French to deploy into battle order from marching order, before falling back under Cossack cover. The Cossacks are particularly suited to this role: small half squadrons, expendable in delaying actions and notorious for their ability of being routed effectively disengaging before the French can isolate and destroy them.
The immediate decision is therefore not whether Ney can be stopped. He cannot. The question is how much time can be extracted from his advance — and what the main Allied army can achieve with that time.
The next question is the location of the Imperial Guard.
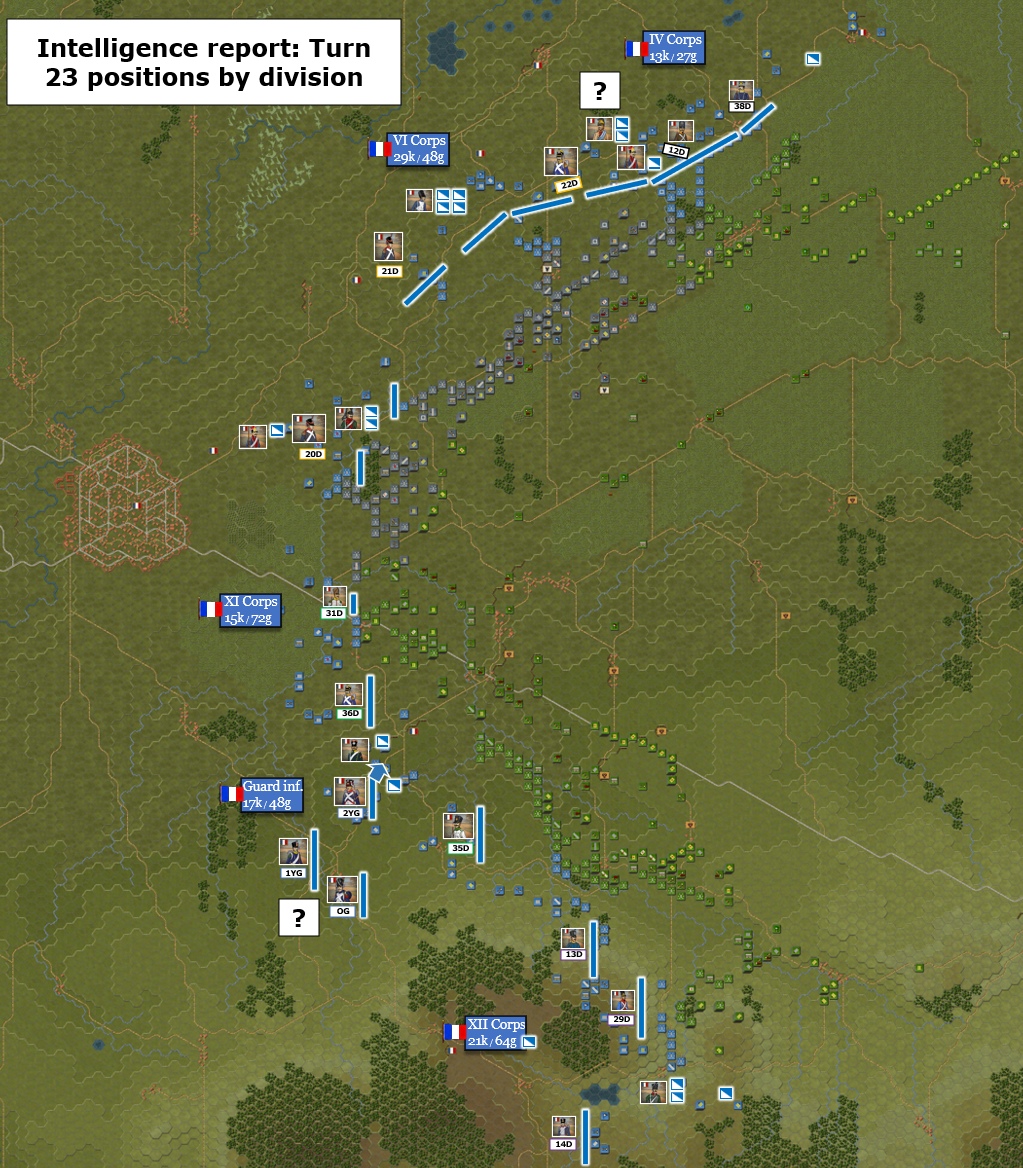
By Turn 21, all French cavalry has been located. The Guard cavalry and the cavalry of I Cavalry Corps are identified on the French left. One Young Guard infantry division is also seen moving toward the Allied left. But the remaining two Guard infantry divisions are still unaccounted for.
My working assumption is that they are moving toward the French right. This seemed logical as Ney was already expected to reinforce the French left in the morning, so there was little reason to send the Guard infantry there as well. The more likely destination was the French right, where XII Corps had already captured the wooded heights opposite the Allied left.
This terrain on the heights suited the Guard well. The woods allowed infantry to operate in open formations, while the hills offered excellent artillery positions. If the Guard concentrated there, it could become the decisive force in a French attempt to crush the arriving Austrians before they could link up with the main Allied army.
If this assessment was correct, around 17,000 Guard infantry were moving toward the French right. This was a serious threat. The Austrian 2 AK and Nostitz's cavalry, around 22,000 men in total, might arrive late, separated from the main army, and vulnerable to defeat in isolation.
The obvious response to the growing threat on the Allied left would have been to move directly against it.
But the French already held the heights. Their artillery was deploying on commanding ground, and my assessment was that much of the Imperial Guard was moving into the same sector. A frontal attack there would mean fighting the strongest French formations on terrain of their choosing.
Exactly the kind of battle I wanted to avoid.
The centre offered a very different picture.
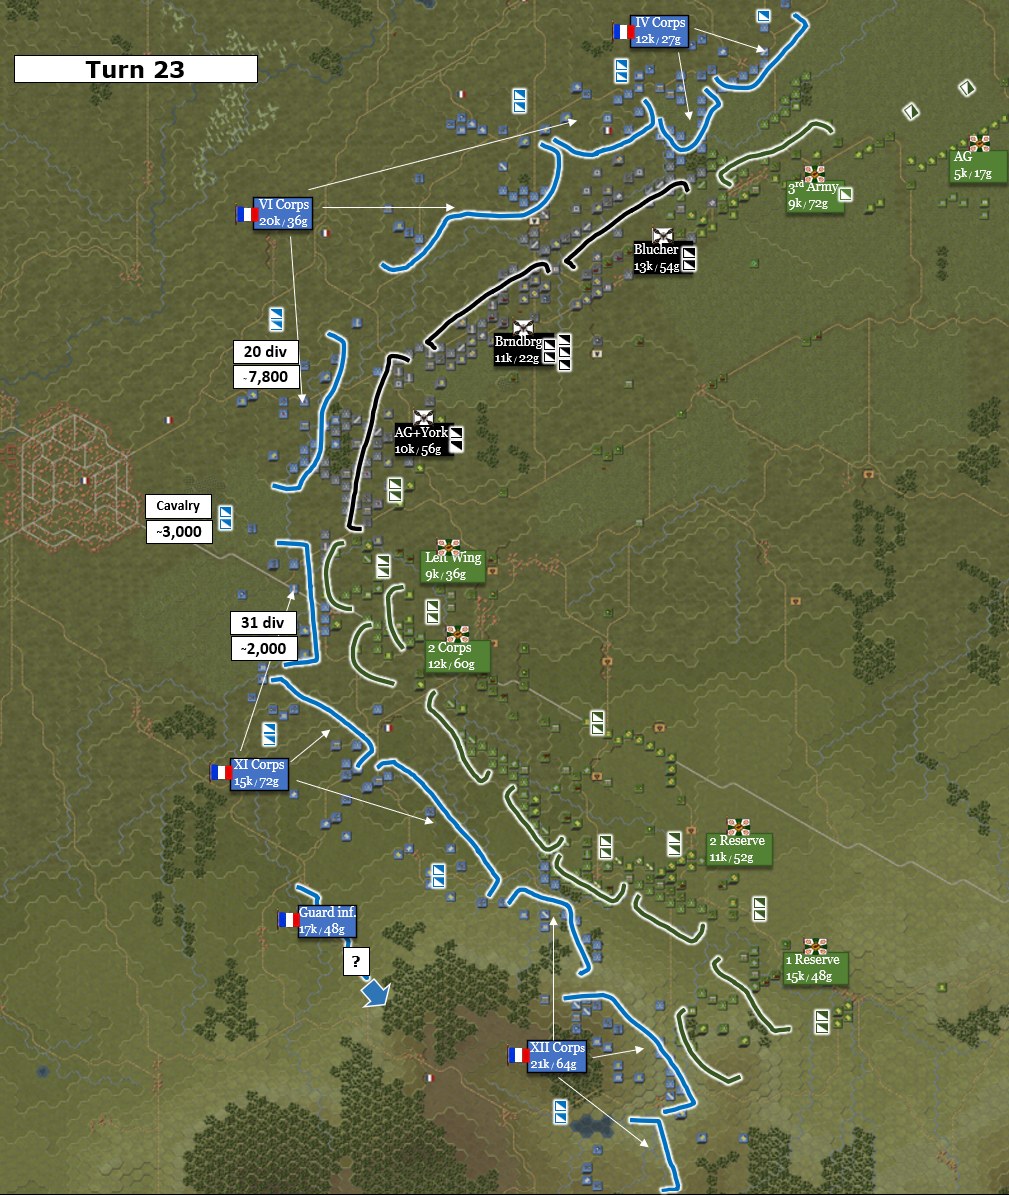
The battered 20th Division of VI Corps, estimated to be down to around 7,800 men, had begun advancing again — almost as if inviting another blow. To its south, the approaches to Bautzen were covered by the 31st Division of XI Corps, the weakest French formation in the sector at only around 2,000 men.
Together, these formations were covering an extended arc of almost fifty hexes.
Their immediate support appeared limited: perhaps 40 guns and 2,000–3,000 cavalry. The remaining divisions of VI Corps — the 21st and 22nd — were still believed to be reorganising after the earlier Prussian attack, while the Guard infantry appeared to be marching away from the centre.
The principal immediate reserve was therefore likely to be the Imperial Guard cavalry and elements of I Cavalry Corps — but even they would need time to reach the threatened sector.
This looked like the weakest point in the French deployment.
And the window was closing.
Ney was approaching the Allied right. Darkness was only two hours away. Once his wing began to influence the battlefield, the Coalition would lose much of its freedom to concentrate offensively.
The aim of the attack was therefore broader than simply gaining ground.
I wanted to exploit the remaining operational window, inflict disproportionate losses while the French centre was still vulnerable, and — most importantly — create a crisis serious enough to force the French command to redirect reserves, especially the Guard, back toward the centre.
If the Guard was indeed moving against the Austrians, I wanted to give it a reason to turn around.
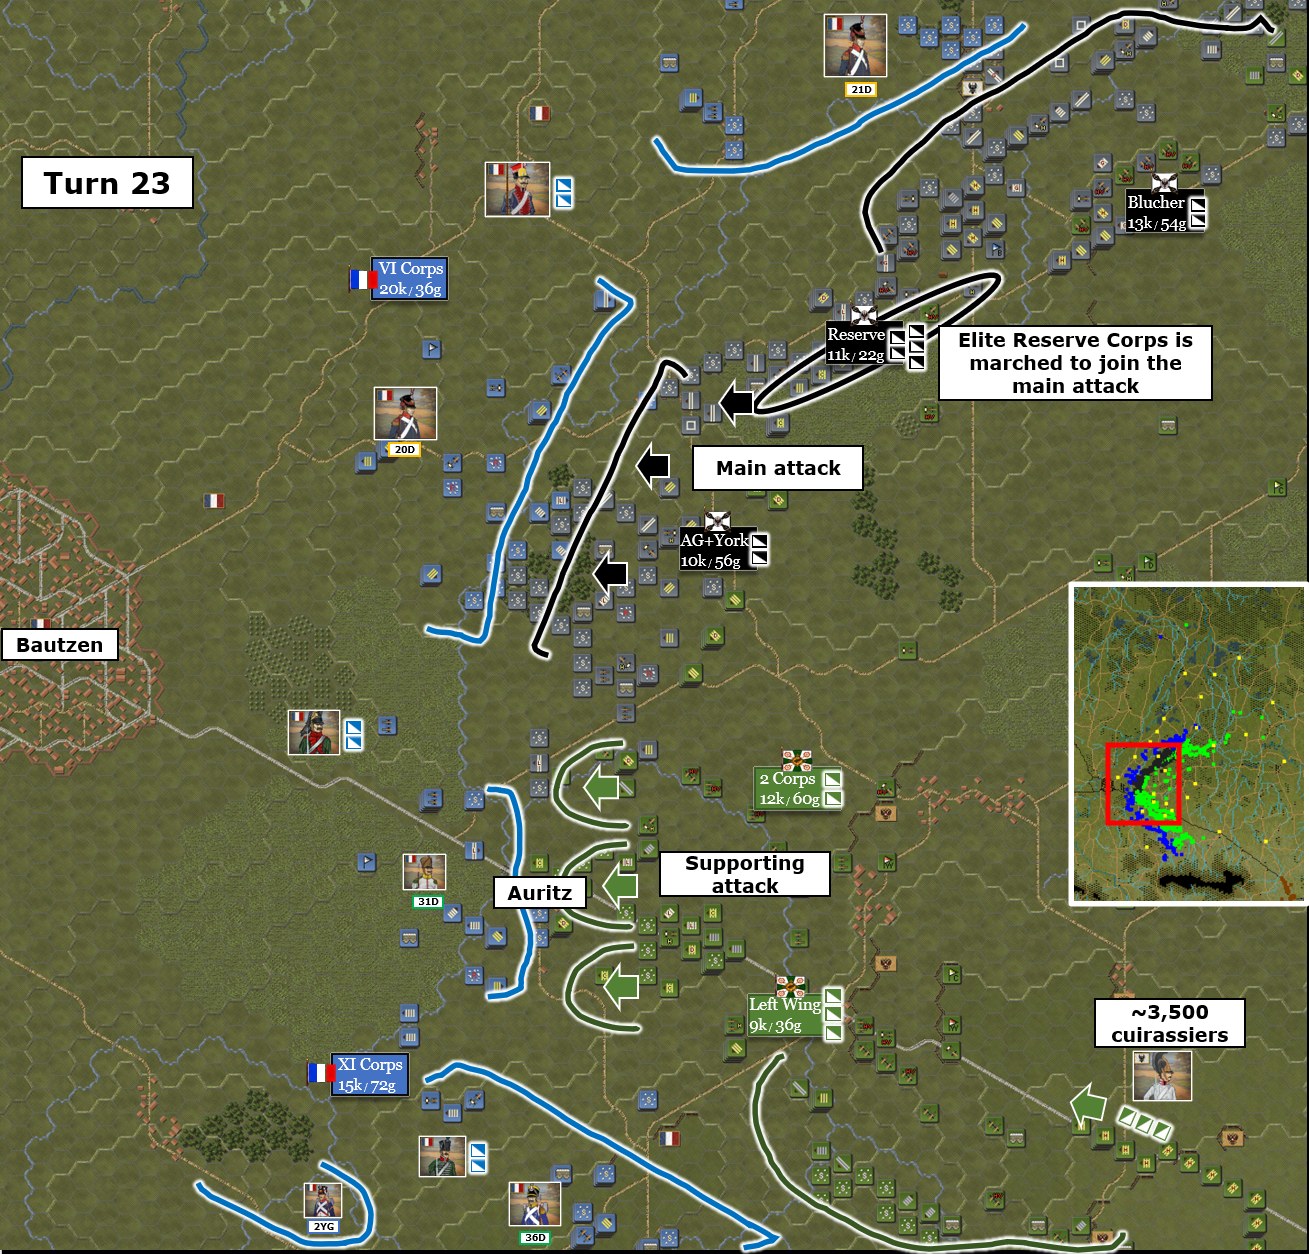
The elite Brandenburg Reserve Corps was therefore ordered to shift from the centre-right to support the Advance Guard and Yorck's Division in another attack against the 20th Division.
Blücher, meanwhile, was ordered to take over the Reserve Corps' former sector and establish a strong defensive position supported by powerful artillery, containing the other two divisions of VI Corps and protecting the flank of the attacking force. Farther north, the Russian 3rd Army would remain on the defensive against IV Corps.
The main blow would fall against the 20th Division.
But it would not be the only one.
To the south, three Russian infantry divisions and two cavalry divisions began concentrating against the village of Auritz, supported by close to 100 guns assembling for the attack. Their objective was to recapture the village, defeat the weak 31st Division covering the approaches to Bautzen, and create a second crisis in the French centre.
Furthermore, around 3,500 cuirassiers from the two Russian Reserve Corps were ordered to march toward Auritz along the pike, leaving only one brigade behind on the Allied left. The aim was to create overwhelming cavalry superiority in the centre.
The intention was simple: force French Headquarters to deal with two emergencies at once and draw away any reserves that might otherwise be sent to rescue the 20th Division.
Overall, the plan was to concentrate around 35,000 troops and 150 guns against a French centre estimated at only 13,000–15,000 men and roughly 50 guns — unless the French committed reserves believed to be marching elsewhere.
Open !BautzenAAR Turn 23_password_Dino — the Russians begin their pinning attack on Auritz. The Prussians are still reorganizing and concentrating.
While the Reserve Corps was still concentrating in the sector, Yorck's Division and the Advance Guard began a frontal attack against the 20th Division, which had resumed its advance and was probing the Prussian position around Niederkaina with a cavalry brigade in close support.
Open !BautzenAAR Turn 25_password_Dino to watch the Prussians commencing their attack on the 20th Division.
Supported by horse artillery, the Prussians pushed forward and forced the French back across the stream onto the high ground beyond.
Then an opportunity appeared. Cossacks and light cavalry from the Prussian Advance Guard found the exposed flank of the 20th Division's 2nd Brigade. They crossed the stream, accepting the resulting disorder, and charged into the French flank.
The division was effectively cut in two.
Open !BautzenAAR Turn 26_password_Dino — the Prussians cross the stream in force, attacking both frontally and into the flank. To the south, the Russians continue their pinning attack, pushing beyond Auritz.
Cossacks burst into the French rear and overran two batteries, while several French battalions and six squadrons of Guard lancers became isolated.
At this moment, the elite Brandenburg Reserve Corps began arriving through the ravine behind the village and crossing the stream onto the French side. Although its cavalry had not fully recovered from the disorder of the crossing, it launched several powerful frontal charges while the lighter cavalry continued exploiting the breakthrough from the flank.
For a moment, the French position threatened to fall apart completely.
But this time the French had reserves close enough to react.
Imperial Guard dragoons were rushed into the sector to reopen the line and rescue the isolated Guard lancers, most of whom were nevertheless lost in the fighting. The French 21st Division was also spotted marching across the wide arc to stabilise the position.
Open !BautzenAAR Turn 28_password_Dino — the Prussians break through the 20th Division, while the Russian attack is stopped and they begin to fall back, losing Auritz to the French counterattack.
Then the Guard Horse Grenadiers arrived.
They launched repeated charges against the disordered Prussian cuirassiers. The Prussians responded by bringing three horse batteries into action, firing canister into the Guard cavalry and inflicting several hundred casualties.
After heavy fighting, three battalions of the 20th Division's 1st Brigade were taken prisoner after becoming isolated and routed. Several other battalions were badly mauled, with losses exceeding 50-75%.
The intervention of the Imperial Guard cavalry and the arrival of the elite Marine brigade of the 21st Division prevented the Prussian breakthrough from expanding farther north-west.
On the south-west, however, the 20th Division's 2nd Brigade received almost no reinforcement beyond a few cavalry squadrons, largely because the supporting Russian attack at Auritz was creating another pressure point on the French line.
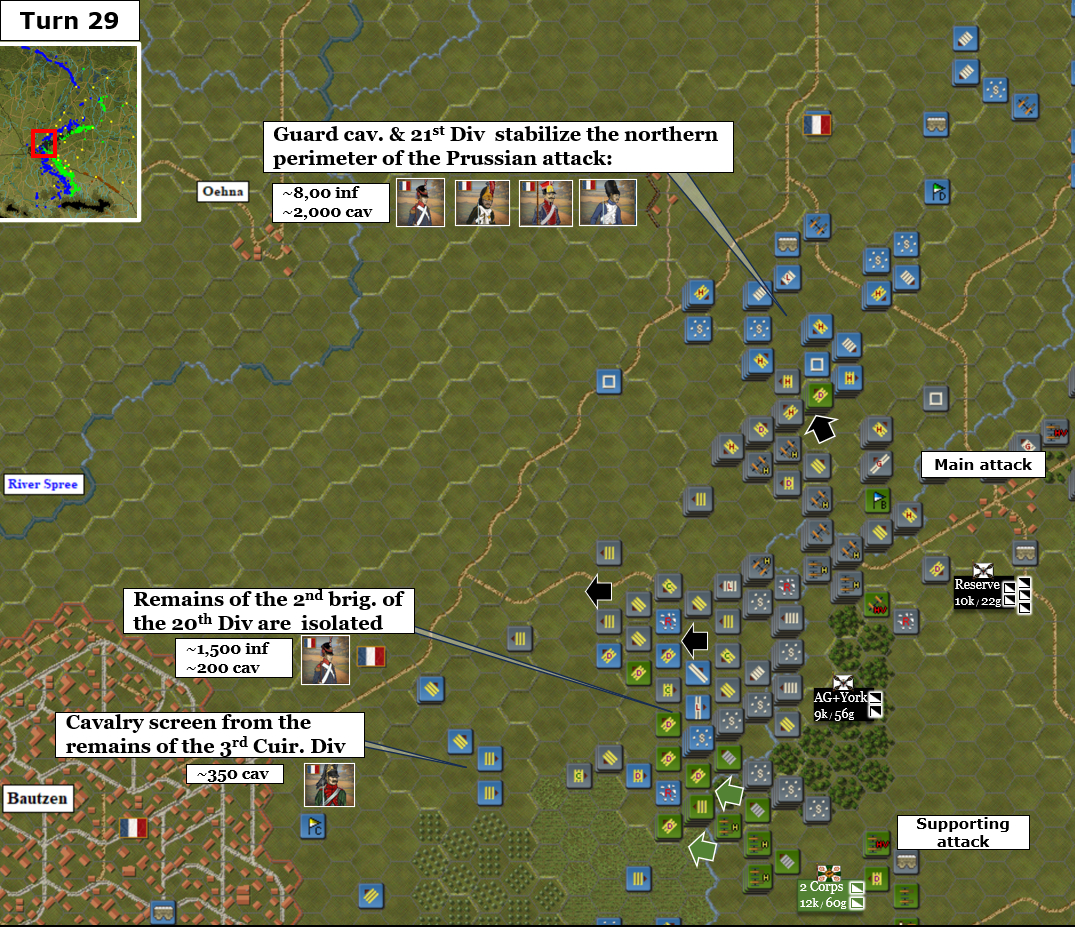
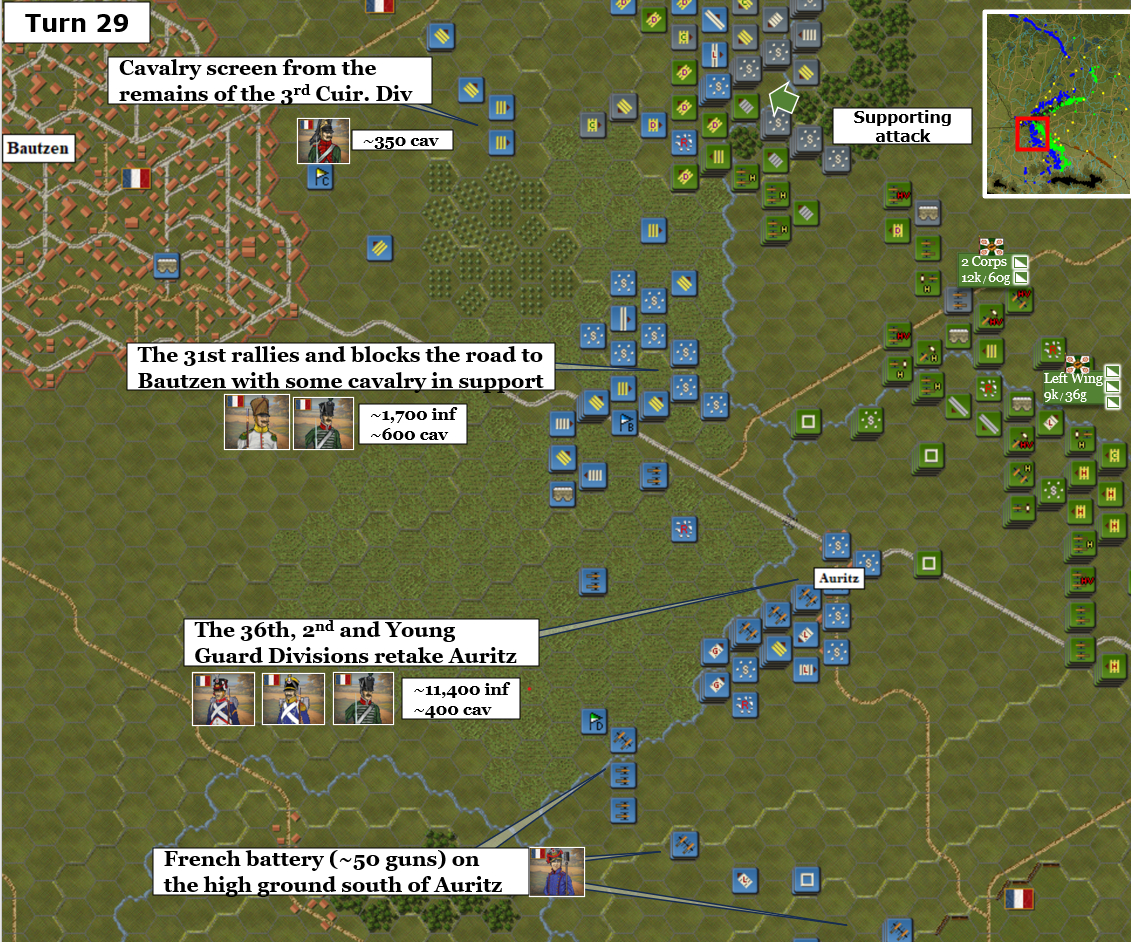
After almost two hours of fighting, by Turn 29 the 2nd brigade was close to total destruction. Its remaining three battalions were surrounded and isolated, together with the brigade and divisional commanders. The supporting French dragoons had also suffered heavily, and the Prussian cavalry eliminated the last French battery in the sector and was now close to breaking through into the open ground beyond.
Open !BautzenAAR Turn 29_password_Dino to overview the situation at the French centre.
The supporting attack at Auritz created a second pressure point and prevented the French from freely reinforcing the 20th Division from the south.
The Russians began attacking Auritz on Turn 22, captured the village by Turn 24, and continued toward Bautzen, partially routing the weak 31st Division.
However, the advance was stalled.
Several Guard batteries and a Young Guard infantry division were redirected toward the sector, while around fifty French guns were concentrated on the high ground overlooking Auritz. The 36th Division of XI Corps was also marched in to reinforce the position.
The 31st Division partially rallied behind the stream beyond the village, where broken terrain and French artillery fire slowed the Russian advance. Once the 36th Division arrived, with the Young Guard forming a second echelon, the French counterattacked and recaptured Auritz via bayonets.
The Russians responded with a charge by elite cuirassiers that badly mauled French light cavalry charging on the right flank of the village, but the offensive had lost momentum. Russian infantry gradually began falling back under heavy artillery fire and repeated French counterattacks.
Tactically, the fighting around Auritz ended inconclusively.
Operationally, however, the attack had achieved its purpose.
French reserves were fixed in the sector. Guard artillery and Young Guard infantry were redirected toward Auritz.
The Russian attack did not break the French line.
But by tying down the forces that might otherwise have reinforced the 20th Division, it helped the Prussians break open the French centre.
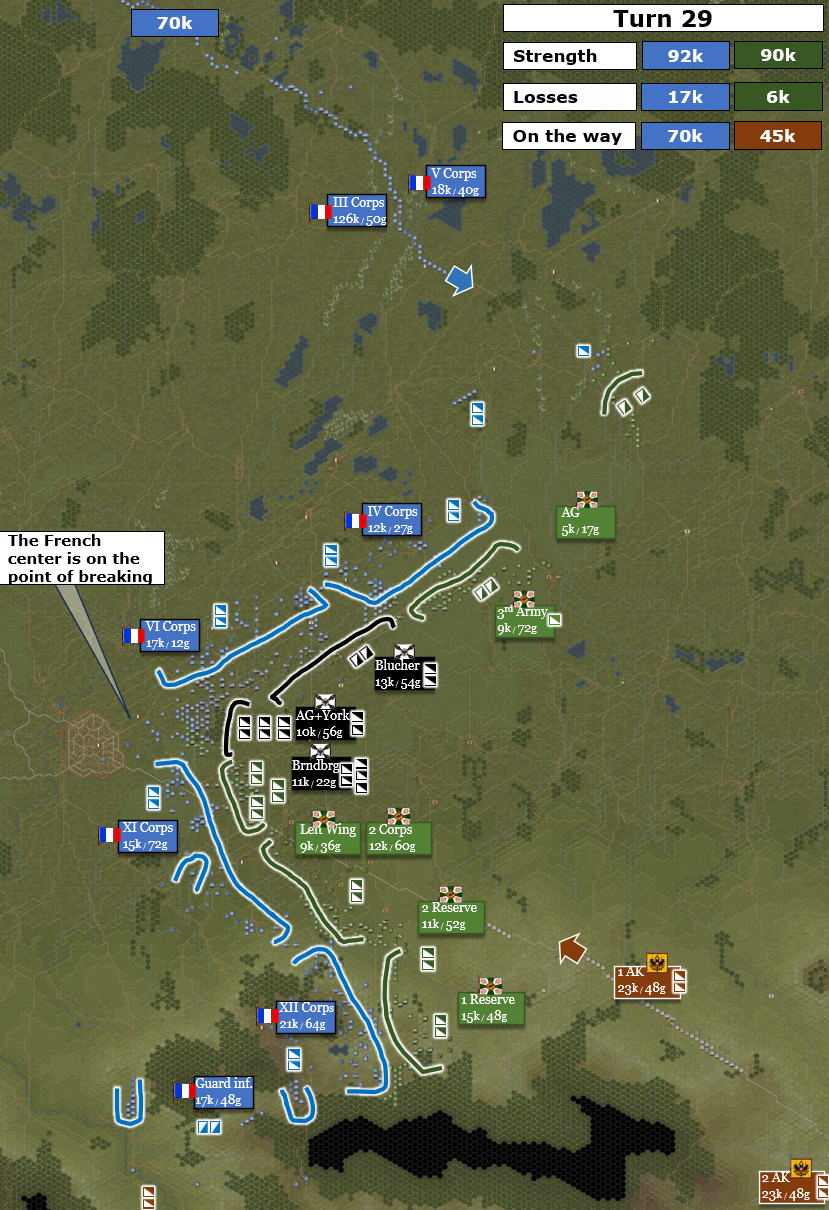
By dusk on Turn 30, the French position around the 20th Division was close to breaking apart.
Only a handful of combat-ready cavalry squadrons covered a gap of roughly twenty hexes between the 21st Division of VI Corps and the 31st Division of XI Corps. Behind the Prussian advance, another 1,500 men of the 20th Division, together with several cavalry squadrons, remained isolated and about to be taken as prisoners.
The 20th Division had effectively ceased to exist.
The neighbouring French divisions were too far apart to restore contact, while the line between VI and XI Corps had been reduced to a fragile screen of disordered cavalry.
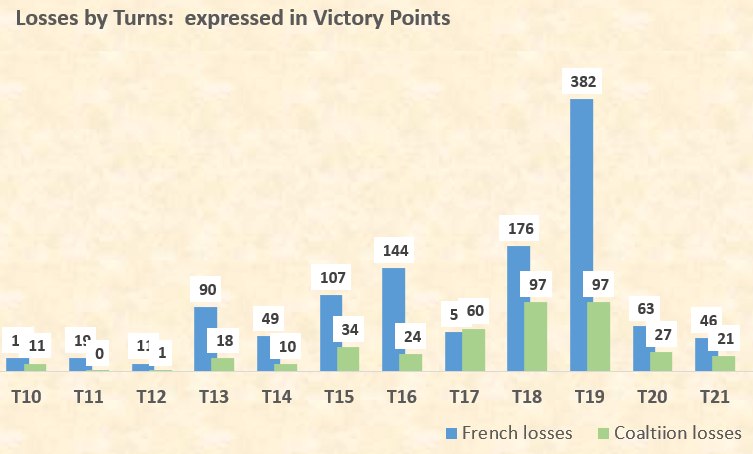
The cost of containing the breakthrough had also been severe. Guard cavalry losses were approaching 1,000 men, while I Cavalry Corps had suffered approximately another 1,500 casualties. The fighting west of Niederkaina alone had cost the French close to 750 victory points.
Around Auritz, by contrast, the fighting remained tactically inconclusive, with neither side gaining a meaningful advantage in victory points.
The Coalition had now moved close to the Allied Minor Victory threshold. With the remaining isolated French formations likely to be eliminated over the next several turns, that threshold was within reach.
Before darkness could bring the first day to an end, the French commander offered his surrender.
Open !BautzenAAR Surrender_password_Dino.
French losses were close to 17,000, compared with ~6,000 for the Coalition. This yielded the Coalition 1,533 VPs from losses, with a further ~200 VPs likely to be gained from French units isolated at the time of the surrender on Turn 30.
The resulting gain of ~1,700 VPs was enough to offset the loss of the Forward VP sector (1,000 VPs) and the imminent loss of the Right Flank VP sector (400 VPs) to Ney's approaching forces, while still retaining a fragile Minor Victory.
French losses were much heavier and concentrated primarily in VI Corps.
Coalition losses fell disproportionately on the Prussians, with the Elite Reserve Corps suffering the highest losses relative to its strength (~12%) after spearheading more than four hours of almost continuous action.
Nevertheless, the Prussian Reserve Corps retained its combat potential despite losing approximately one-quarter of its elite cavalry, although it needed time to reorganise.
No Coalition formation had been severely damaged, and all remained capable of offensive operations the following morning.
The first day confirmed most of the assumptions made before the battle.
The Allied decision to abandon the Forward VP line proved correct. It allowed the army to concentrate around the central road network and preserve freedom of manoeuvre. This became the decisive operational advantage.
The French made two important choices that shaped the battle.
- First, they advanced before the cavalry of I Cavalry Corps and the Imperial Guard had joined the first infantry echelon.
- Second, they advanced across a broad outer arc with limited roads connecting the flanks to the centre, reducing mutual support as the front expanded.
The Coalition deliberately exploited these conditions.
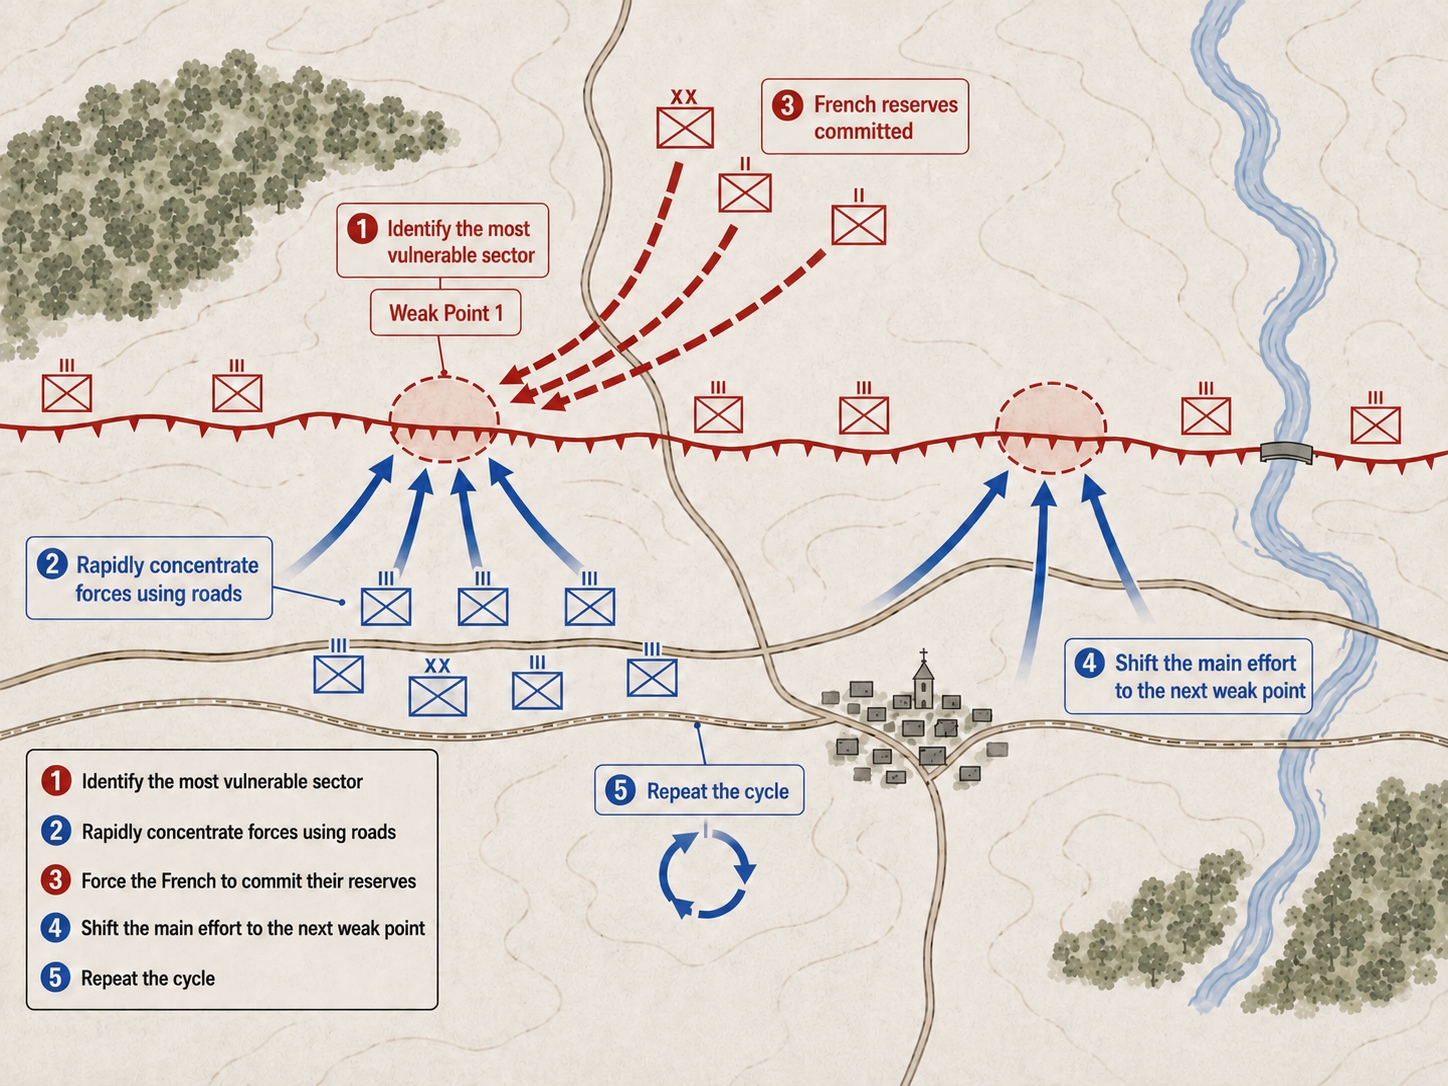
The important factor was the Coalition's ability to shift its main effort repeatedly using central position and road network.
Rather than persisting against sectors that had already been reinforced, Allied HQ redirected its attacks to the next vulnerable point. The first Prussian offensive successively targeted the 20th, 21st and 22nd Divisions of VI Corps, while the neighbouring IV Corps remained engaged and pinned by the Russian 3rd Army.
The second offensive then returned against the weakened 20th Division, while a simultaneous Russian attack at Auritz fixed the neighbouring 31st Division.
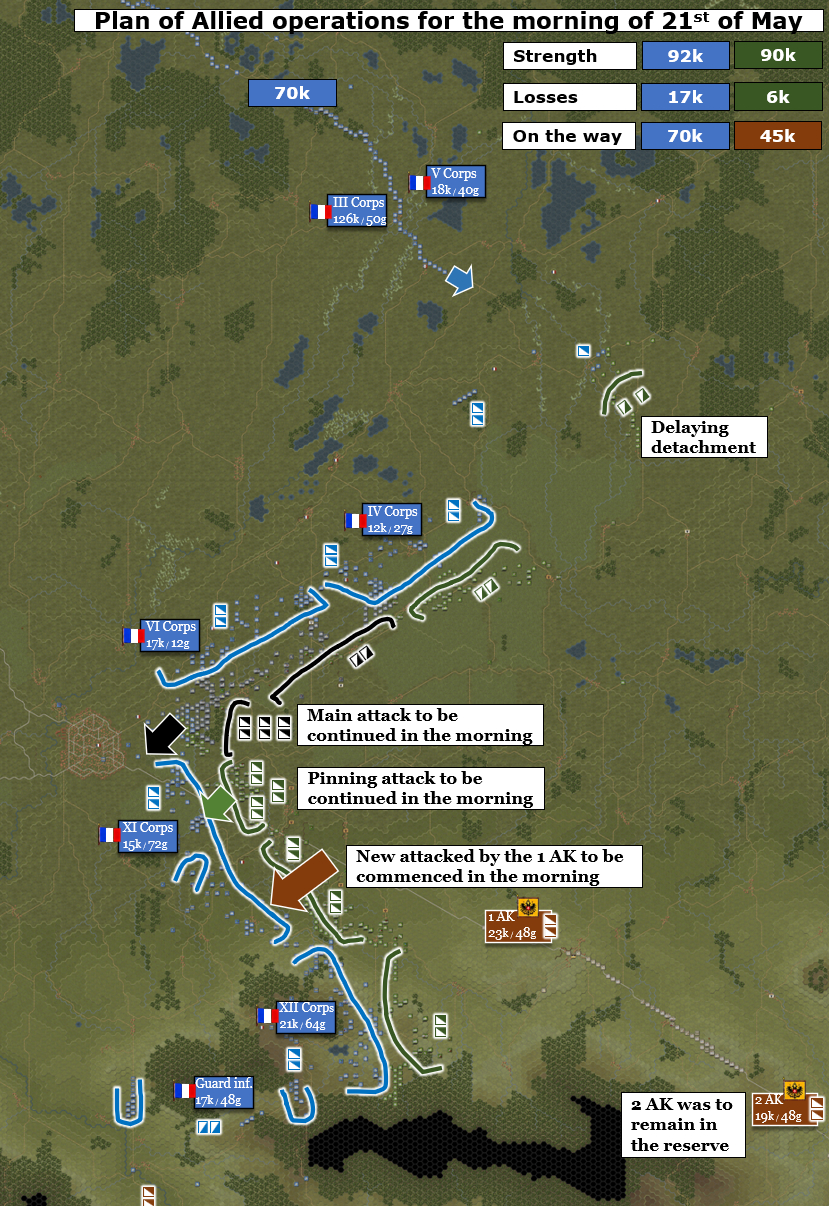
Had the battle continued into the second day, the same operational concept would have been repeated against the remaining French centre and XI Corps with Austrian 1 AK joining the effort.
Unusually, the main Allied offensive developed against the French centre. Typically, this is the most difficult sector to attack because both flanks can feed reserves into it. At Bautzen, however, the French deployment had evolved into an extended V-shaped formation, with the centre stretched across nearly fifty hexes and lacking an immediate operational reserve.
This reversed the usual logic. The Coalition could concentrate in the centre faster than the French could reinforce it.
At the same time, the French attempt to achieve several objectives simultaneously contributed to this overextension. A substantial force was committed to capturing the heights, while two Guard infantry divisions, one cavalry division, and Guard horse artillery were positioned behind the right flank to contain the expected Austrian arrival.
As a result, roughly one-third of the French army—including the elite formations of the Old Guard and 1st Young Guard—became detached from Napoleon's command and effectively tied down in a sector where no major action occurred. A substantial concentration of combat power had been positioned to meet an Austrian threat that never fully materialised (see Section 15), producing an operational "empty punch" while the decisive crisis developed elsewhere.
The result was a battlefield in which the Coalition repeatedly dictated where and when decisive action would take place and repeatedly applied the same operational cycle:
- Identify the most vulnerable sector.
- Concentrate overwhelming local superiority.
- Force the French to commit their reserves.
- Shift the main effort to the next weak point.
- Repeat the cycle.
Identifying the vulnerable sectors and gathering intelligence therefore became the foundation of the concept.
French HQ Perspective
It was during the planning stage that I made my most significant error in judgement—an error that would dictate the course of the battle.
Although the French had a significant numerical advantage on paper, much of the fighting on the first day would fall to the initial 78,000 men against the combined army of 93,000 Prussians and Russians. The bulk of the French cavalry and the entire Guard were initially frozen, while Ney arrived around 15 kilometres from the battlefield on poor roads. At best, only a few hundred of his cavalry were likely to see any fighting on the first day.
The Coalition initially had only around 36,000 men available. I believed it could successfully make a stand until reinforced, but this involved a risk. The Allied commander instead took the more cautious route and followed the historical plan of falling back on the main force. This also drew the French farther away from their own frozen units and Ney’s reinforcements.
My mistake was looking at the total numbers, believing I had the numerical advantage, and then trying to stretch the Allied line to create weak points before massing superior numbers against them. I also assumed that substantial Allied forces would have to remain unengaged on the right to counter Ney’s eventual arrival. That never happened.
Apart from the French right wing, the rest of the formations were stretched far too thin, unable to support one another or even fight effectively on their own. This was a known risk that I willingly took, on the assumption that I would have a significant numerical advantage at the points of my choosing. That assumption proved completely wrong.
By 4:00 pm, I had lost all initiative and was constantly reacting to Allied attacks. I was looking for “the weak points” that I knew must be there, not realising that the Coalition had the numerical advantage and that the weak points were all mine.
It may seem that the French were being aggressive and trying to force a victory on the first day, but that was not the case. The plan was simply to spread the Allies and take ground that was likely to become problematic on the second day, rather than trying to defeat the enemy on the first.
One of the most important elements of Allied decision-making was the systematic effort to build and maintain an operational picture of the French army.
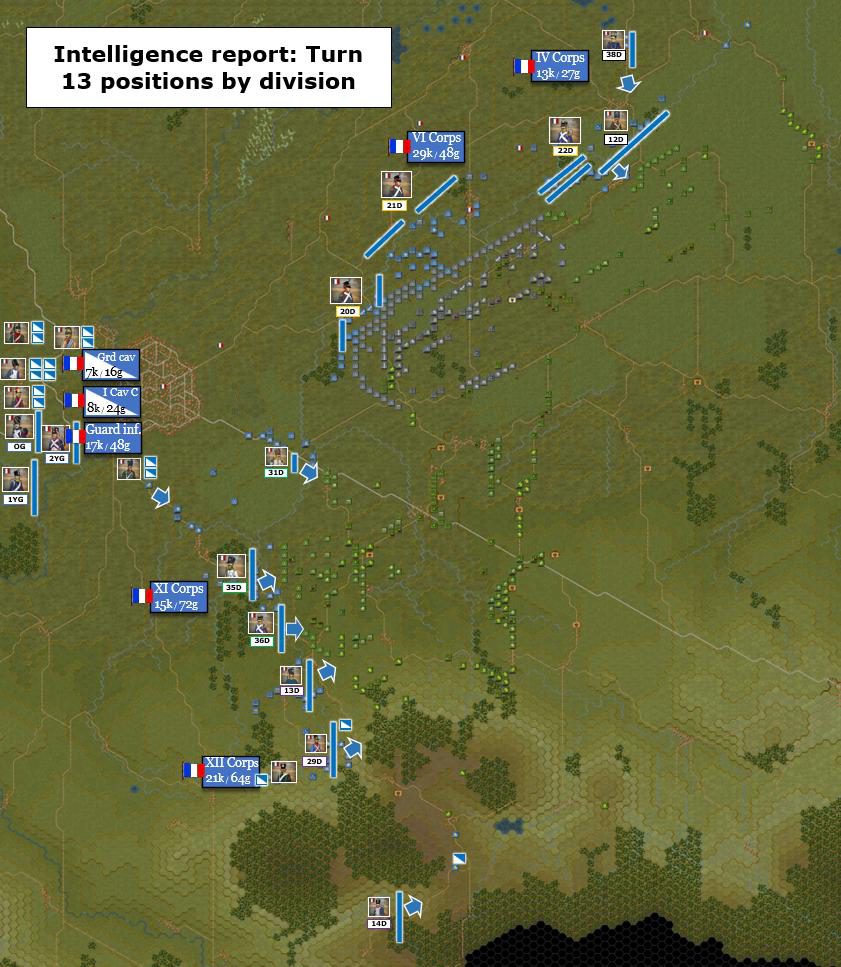
As French formations were identified, they were assigned uniform icons and mapped from the start. Their movements were then tracked to estimate marching routes, force allocation, likely destinations, arrival times, and remaining combat strength.
Because cavalry pickets maintained near-continuous contact with the enemy, the intelligence picture was relatively reliable. This made it possible to identify isolated divisions, available supporting formations, likely reserve locations, and—critically—how quickly those reserves could intervene.
Both major Prussian counterstrokes depended heavily on this information. Rather than simply reacting to the forces immediately in front of them, the Coalition could identify weaknesses and concentrate against them. Tracking Ney's approaching formations also shaped planning for the second day.
The outcome could not have been achieved without this effort. By turning scattered battlefield observations into a coherent operational picture, the intelligence system made uncertainty manageable.
An example of the intelligence report for Turn 23 is shown on the right-hand side. Even at first glance, it is clear that the French centre is overextended and appears relatively weak, especially if the Guard infantry is assumed to be leaving the centre-right to meet the yet-to-arrive Austrians.
In this battle, mapping the enemy became almost as important as finding the right tactical formula to defeat him.
Note: this AAR was played as a standalone scenario, in which both players have access to the opposing Order of Battle from the outset. Consequently, it was possible to use the intelligence system described above to track enemy movements, estimate future concentrations, and assess the availability of reserves.
In contrast, Campaign mode provides only the information contained in the initial scenario briefing, which may be incomplete or even misleading and generally focuses on the strategic situation rather than the operational disposition of enemy forces. The size, composition, location, and combat strength of opposing formations are largely unknown, closely reflecting the uncertainty faced by historical commanders.
As a result, building an accurate operational picture through reconnaissance becomes much more challenging, and the added uncertainty makes decision-making in Campaign mode much more difficult.
The battle also demonstrated the importance of combined arms over numerical strength alone.
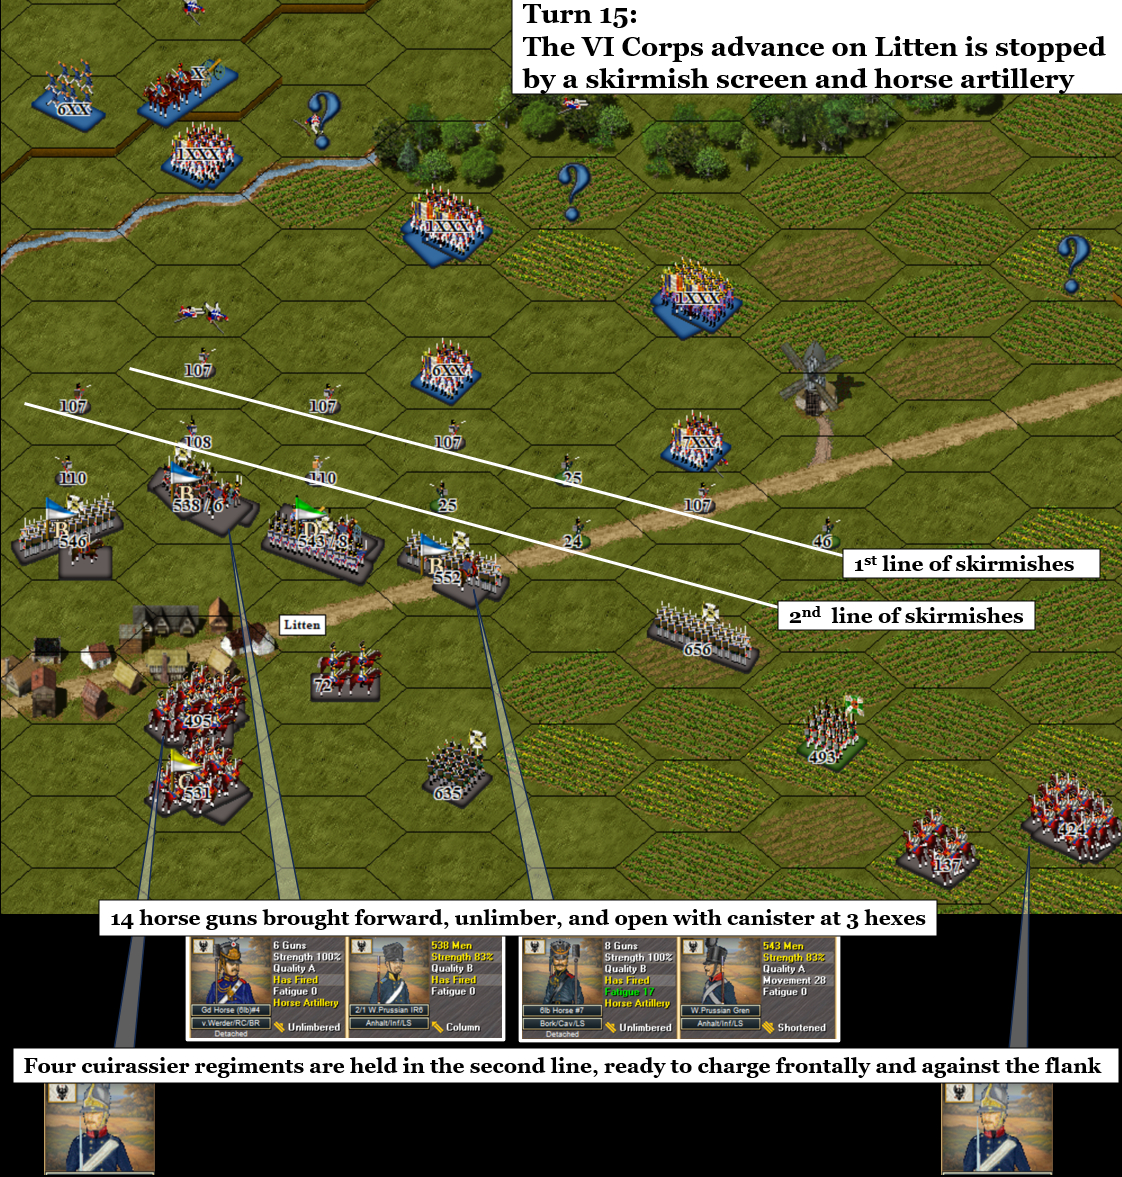
During the first phase, described in section 8, French infantry entered action with limited cavalry support. This allowed Prussian skirmishers to operate aggressively in the first echelon, blocking French advance and occasionally disordering formations with musket fire (see the example on the image).
Horse artillery was particularly important moving forward aggressively. Up to a dozen horse batteries were concentrated at the points of attacks, while foot artillery dominated the flanks and discouraged major French offensives elsewhere. With no enemy cavalry to threaten them, Prussian horse batteries advanced behind the skirmish screen and fired canister at close range (see the example on the image).
Open !BautzenAAR Turn 15_password_Dino. This action on the image can be seen at the beginning of the replay.
Prussian cavalry then exploited the resulting disorder, breaking exposed formations or isolating them via encirclement. Formed infantry followed to deliver close-range volleys and bayonet attacks under favourable conditions.
The key was not artillery or cavalry alone, but the interaction between all arms.
This method became ineffective once the French cavalry arrived. The second Prussian attack, described in Section 9, therefore developed differently. Facing a more balanced French combined-arms force, success depended primarily on local superiority and the excessive frontage held by the 20th Division.
With French cavalry now present in strength, Allied horse artillery operated more cautiously from the second echelon, while skirmishers played almost no meaningful role.
Prussian cavalry exploited a gap between its brigades and split the division. Elite heavy cavalry applied pressure frontally, while light cavalry and Cossacks worked around the flanks and penetrated the rear, overrunning enemy batteries. Six French battalions and several cavalry squadrons were eventually isolated and eliminated.
The tactical method therefore changed with the battlefield conditions. The first attack relied on skirmish screens and aggressive horse artillery to disorder enemy formations. The second relied on cavalry concentration, overall local superiority, and the exploitation of gaps.
French HQ Perspective
The French were hugely outgunned. They had only 32 heavy and 34 horse-artillery guns, compared with 210 heavy and 200 horse-artillery guns for the Coalition.
With little in the way of cover, the long-range capability of the Coalition heavy artillery made attacking impractical at many points, while its horse artillery provided a tactical advantage that proved decisive on numerous occasions.
The arrival of the French cavalry helped to stabilise the situation temporarily, but it was too limited in number and spread too thinly to contain every crisis. Once the Allies stopped retreating, every French advance was met by a savage counter-attack and mercilessly routed.
In the end, it was the combined arms of the Allies that proved decisive against the infantry-heavy French army. I never found a way to counter it in either attack or defence.
Artillery strength is usually assessed by comparing the total number of guns listed in each side’s order of battle. For operational planning, however, the more useful question is not simply how many guns an army possesses, but how many can influence the battle, and for how long. A battery that remains fixed, spends the engagement marching, or arrives after the decisive action cannot be valued in the same way as one available throughout the entire action.
The full scenario OOB showed 669 Coalition guns against 492 French guns, a ratio of approximately 1.36:1. During the actual engagement from Turn 12 to Turn 30, however, the balance was considerably more uneven.
A gun-turn simply represents one gun being available to influence the battle for one turn. It does not mean that the gun necessarily fired, but records the period during which it could realistically be brought into action.
The Prussian and Russian armies had 573 guns available throughout the nineteen-turn engagement. Of the 299 French guns present with the opening army, 65 Guard guns and 24 guns of the I Cavalry Corps did not become available until Turn 20 — so only 210 guns were in action during Turns 12–19. Ney’s artillery never reached the battlefield on the first day and contributed nothing at all.
Taken across the engagement as a whole, Allied artillery dominated the battle and maintained a substantial availability advantage throughout its decisive phase.
This measure is not intended to calculate actual artillery effectiveness, which still depends on terrain, line of sight, ammunition, battery quality and tactical concentration. Its purpose is to show that the timing and location of an engagement may matter as much as the total number of guns shown in the scenario lobby.
The balance is also not fixed entirely by scenario design. Players can shape it through manoeuvre and timing. Retreating to consolidate, selecting ground suitable for artillery, delaying action until reserves arrive, or drawing the battle away from enemy reinforcement routes can all increase one side’s effective artillery availability.
At Bautzen, the Coalition withdrawal from the Spree concentrated the Prussian and Russian armies and drew the main action farther away from the French Guard and Ney’s approaching wing. Almost the entire Allied artillery park could therefore participate, while much of the eventual French artillery strength remained unavailable.
The same principle applies to infantry and cavalry: their nominal strength matters less if they are fixed, dispersed, delayed or positioned too far from the decisive action. The effect is generally greater for artillery, however. Guns are less manoeuvrable, require suitable ground and lines of fire, and need time to deploy before they can engage effectively. The interval between movement and meaningful combat contribution is therefore usually much longer for artillery than for the other arms.
For players, the practical lesson is to assess forces not only by nominal strength, but by their expected availability during the decisive phase. Before committing to battle, consider the following:
- How many guns can reach the selected position?
- Within what timeframe? Any traffic jam on the way? Consider enemy actions to delay your march — Cossacks easily spoil an estimated time of arrival.
- How long will they take to deploy for battle at effective range? [I usually allow two to three turns for this phase.]
- How many turns are the guns likely to remain relevant before the enemy falls back to a second line, or visibility drops?
A smaller artillery park available throughout the engagement may be more valuable than a larger one arriving after the critical decisions have already been made. Players should therefore consider timing, withdrawal, concentration and battlefield selection to maximise their own gun-turns while reducing those available to the opponent. This is exactly what was done in this battle, with the Allied army evacuating the forward line and falling back towards the main body.
Ironically, the French surrender came at the moment when Allied Headquarters was preparing for what it expected to be the most dangerous phase of the battle.
As often happens in PBEM games, both sides perceived their own situation as considerably worse than it appeared to the opponent.
By dusk, the Prussian offensive had culminated. The French centre was close to breaking, but the attacking formations required reorganisation and, under the night house rules, both armies would disengage overnight. The French would undoubtedly use the same opportunity to rebuild their line.
Meanwhile, Ney was steadily approaching the Allied right, while the arrival locations of the Austrian formations remained unknown.
My intention for 21 May was nevertheless to continue the offensive and largely ignore Ney until the main battle was decided, leaving the delaying detachment formed on Turn 21 to slow his advance.
The French centre remained the weakest sector of the line, with only a single Young Guard division immediately available as a reserve. By dusk, the enemy centre had also lost a significant share of its artillery, with 32 guns eliminated.
- The Prussians would reorganise overnight, reinforced by a division of Russian elite cuirassiers and horse artillery, and resume their attack toward Bautzen.
- The Russians would maintain pressure around Auritz and use their powerful artillery to fix French formations in the centre.
- The arriving Austrian 1 AK, around 23,000 strong, supported by Russian artillery and one division of elite cuirassiers, would attack the next identified weak point — the 36th Division of XI Corps.
The objective was to apply the same operational method for a third time: fix the French across a broad front, concentrate against the weakest sector, and create local superiority before French reserves could react.
Whether this would have succeeded is impossible to know. The French could reposition reserves overnight, concentrate more of the Imperial Guard cavalry against the Prussians, or redirect Ney against the 3rd Russian army on the Allied right instead of continuing his wider flanking march.
The post-game Austrian arrivals made the picture even more interesting. Nearly 3,000 Austrian elite cavalry appeared on the westernmost road, where they would probably have found themselves isolated on unfavourable terrain by a French combined-arms force of Old Guard, Guard horse artillery, and French cavalry formations, and eventually forced to withdraw without playing a significant role.
2 AK, however, arrived along the main pike behind 1 AK. This would be a much welcomed arrival scenario, as the 19,000 troops of 2 AK would be acting as an army-level reserve. Had 1 AK become heavily engaged against XI Corps, 2 AK could have been used to delay Ney long enough for the main army to disengage and retreat towards the exit zones.
The second day could therefore have become an entirely different battle.
One commander believed the balance had already shifted too far to recover. The other believed the most dangerous phase was still ahead. Both assessments had a rational basis.
The Coalition also retained a final option. If the morning situation proved unfavourable, it had accumulated enough victory points to withdraw along the central pike toward the exit zones, establishing a powerful defensive position over a narrow front, covered by its artillery.
The first day had produced a clear Allied success. What remained unanswered was whether that success could survive the arrival of the rest of the French army.
French HQ Perspective
By the end of the day, the casualties were embarrassingly lopsided, and the Coalition had all but achieved a decisive victory. The French centre had been rendered entirely ineffective. One Young Guard division and all of the Guard artillery had already been diverted to prevent its complete collapse.
I doubted that the entire French Guard and XII Corps would be enough to stop the combined Austrian and Russian Guard threat, and now that force had already been seriously weakened. Ney would also need to divert at least some of his troops to support the decimated IV and VI Corps, making any attack on the Allied right less effective.
While the tactical possibilities remained intriguing, I could not see any feasible way to turn the battle around sufficiently to change the result. Even with Ney, the effective French numerical advantage had been reduced to the point where it was negligible and would probably be entirely offset by the Allied superiority in cavalry and artillery.
There was also the fact that I did not realise the true situation until after the game had ended. History says that the Allies were outnumbered and on the defensive throughout the battle. I could not get that picture out of my head, and it had a major impact on the game.
Further Reading
If you enjoyed this AAR, you may also find the following links useful. Together they form a practical library of case studies covering a wide range of offensive and defensive operations within the WDS Napoleonic Battles series.
-
-
 1809. The Battle of WagramFocus: Positional Defence and the psychology of fighting a losing battle.
 -
 1806. The Jena–Auerstedt CampaignFocus: Delaying Action (Jena) and Meeting Engagement (Auerstedt).
 -
-
-
Focus: Campaign background and strategic decision rationale.
-
Focus: Battle planning.
-
Focus: Bridgehead operations.
-
Focus: Operational and tactical assessment.
-
Focus: Battle planning.
-
Focus: Direct assault and post-battle assessment.
-
Focus: Rearguard action planning and defensive battle planning.
-
Focus: The actual flow of the battle.
-
Focus: Offensive battle planning.
-
Focus: The conclusion of the battle and after-action analysis.
For readers new to the WDS Napoleonic Battles series, this manual provides an introduction to the key operational and tactical concepts used throughout the After Action Reports. It covers:


 {{ guardOverlay }}
{{ cfsOverlay }}
{{ guardOverlay }}
{{ cfsOverlay }}
 {{ spreeOverlay }}
 {{ frenchMoves }}
{{ reserveOverlay }}
{{ prussianOverlay }}
{{ xiiCorpsT11Overlay }}
{{ xiCorpsT11Overlay }}
{{ viCorpsT11Overlay }}
{{ ivCorpsT11Overlay }}
{{ frenchMoves }}
{{ reserveOverlay }}
{{ prussianOverlay }}
{{ xiiCorpsT11Overlay }}
{{ xiCorpsT11Overlay }}
{{ viCorpsT11Overlay }}
{{ ivCorpsT11Overlay }}
 {{ viCorpsOverlay }}
{{ div31Overlay }}
{{ iva4CorpsOverlay }}
{{ div34kOverlay }}
{{ div28kOverlay }}
{{ viCorpsOverlay }}
{{ div31Overlay }}
{{ iva4CorpsOverlay }}
{{ div34kOverlay }}
{{ div28kOverlay }}


 {{ xiiCorpsOverlay }}
{{ guardInfOverlay }}
{{ schwarzenberg1akOverlay }}
{{ oneAkMarchOverlay }}
{{ iakRightOverlay }}
{{ neyWingOverlay }}
{{ neyDelayOverlay }}
{{ s92BoxOverlay }}
{{ austrianArrivalOverlay }}
{{ xiiCorpsOverlay }}
{{ guardInfOverlay }}
{{ schwarzenberg1akOverlay }}
{{ oneAkMarchOverlay }}
{{ iakRightOverlay }}
{{ neyWingOverlay }}
{{ neyDelayOverlay }}
{{ s92BoxOverlay }}
{{ austrianArrivalOverlay }}
 {{ blueBracketsOverlay }}
{{ centreHighlightOverlay }}
{{ fiftyHexesOverlay }}
{{ guardInfCentreOverlay }}
{{ div2122Overlay }}
{{ s93BoxOverlay }}
{{ blueBracketsOverlay }}
{{ centreHighlightOverlay }}
{{ fiftyHexesOverlay }}
{{ guardInfCentreOverlay }}
{{ div2122Overlay }}
{{ s93BoxOverlay }}
 {{ brandenburgOverlay }}
{{ agYorkOverlay }}
{{ blucherOverlay }}
{{ div20Overlay }}
{{ auritzOverlay }}
{{ cuirassiersOverlay }}
{{ brandenburgOverlay }}
{{ agYorkOverlay }}
{{ blucherOverlay }}
{{ div20Overlay }}
{{ auritzOverlay }}
{{ cuirassiersOverlay }}
 {{ twentyHexGapOverlay }}
 {{ resumeAttackOverlay }}
{{ auritzPressureOverlay }}
{{ weakPointOverlay }}
{{ resumeAttackOverlay }}
{{ auritzPressureOverlay }}
{{ weakPointOverlay }}